
How We Made $200 Amazing Vinyl DIY RV Skirting for Winter
This post may contain affiliate links.
If you are living in an RV in a cold climate, RV skirting is a MUST. Here is how we made our $200 DIY vinyl RV skirting.
RV Skirting Options
There are many options for skirting your RV. After researching the options available for our 5th wheel skirting, we found they pretty much boiled down to these:
- Custom RV skirting. ($$$$) Some companies will come to you, and some require you to travel to them. Either way, this option is great quality, but it’s also the most expensive option. It usually requires drilling holes along the bottom of your RV to install the snaps or channels for hanging the skirting.
- An inflatable AirSkirt. ($$$) An AirSkirt is an inflatable skirting made from heavy-duty vinyl that is inflated by an electric pump and is held in place by pressure. It doesn’t require drilling holes or using any adhesives. It’s designed to be easy to take down, transport, and put back up, so is a great option for people who need to move frequently instead of staying in one place all winter.
- Professional RV skirting. ($$) This self-installed skirting kit is popular with many RVers, but reading about it left me wondering if I could make the same thing for less.
- DIY RV skirting. ($) This can be made from various materials, including:
- Plywood or particle board. Sturdy and warm, but not cheap to pay for all that lumber, and not easy to install, remove, or transport.
- Foam board insulation. Sturdy and warm, easy to install, could be transported, but not very environmentally friendly. However, skirting an entire RV costs about $100—by far the cheapest option. Read this tutorial for how to create your foam board skirting.
- Plastic is cheap but not as sturdy. It is also not very environmentally friendly, and installation presents some challenges.
- Vinyl (What we chose!). I ended up choosing vinyl skirting because I hoped to reuse it and because it’s the time-tested choice of most professional skirting companies. I purchased billboard tarp vinyl, essentially a reused billboard (more details below).
Not sure which one to choose? Read this: RV Skirting Solutions for Every Budget
What type of vinyl is good for DIY RV skirting?
Some RV owners use insulated tarps to make RV skirting. At first, I thought along the same lines—that thicker is better. But then I learned that R-value isn’t necessarily the most important factor in RV skirting. The insulation actually comes more from trapping air underneath the RV than from the thickness of the vinyl.
Since insulated tarps are more expensive and heavier, I decided the thinner vinyl would be fine. Ultimately, I chose to use 11 mil billboard tarp vinyl (these are recycled billboards!). This is the same type of vinyl many custom RV skirting companies use.
However, it’s worth noting that this skirting setup was for insulating against temperatures below freezing but above zero.
Suppose you are RVing in a climate where temperatures stay in the single digits or below zero for extended periods. In that case, you may want to consider a thicker material, such as insulated tarps or rigid foam board, as discussed later in this article.
Read next: How to Stay Warm in a Cold Camper
You may also want to purchase a remote wireless thermometer so that you can accurately monitor the temperature under your RV and wherever your pipes and water lines are located. This will tell you with certainty how well your RV skirting is working and whether you need to supplement with a light or space heater under your RV.

- Connect Note: Pls install the station battery first, then install the sensor battery. If a specific channel is lost, press the CHANNEL/+ button until the channel indication single flashing.Verify the humidity sensors match closely with the console and the sensors are in the same location (about 1-3 meters apart). The sensors should agree within 10% (the accuracy is +/- 5%). Allow about 30 minutes for all sensors to stabilize.
The billboard tarp vinyl company I ordered from offers two color choices: Black or White.
Since making my skirting, I’ve found out about other companies, such as CoversAndAll.com, that sell new vinyl tarps in various colors pre-cut to the exact sizes you need. They will even add grommets, D-rings, or loops along the edges if you want them to. In hindsight, this would save you a LOT of time. I would recommend it.
How We Made Our Vinyl RV Skirting
Supply List:
Below are the supplies we used and what we paid for them.
- Vinyl tarp material, enough to skirt our 38-foot fifth wheel, including the gooseneck and three of its four slides: $92.27. We used 11-millimeter-weight billboard tarp vinyl purchased from BillboardTarps.com.
- Brass tarp grommets and grommet tool. This set came with 500 grommets, which was way more than enough. Last year, we didn’t use a grommet tool, just a cheap tool and dye with a hammer, and the task was much more difficult and time-consuming. This handheld grommet punch made this job one thousand percent faster and easier. Both the grommets and grommet punch cost us $42.48. It was well worth it.
- Steel tent stakes. We ended up needing about 75, which cost around $30.
- Clear adhesive hooks. We used 65 for our 37-foot fifth wheel.
- One garment bag (optional) $10.99
- Duct tape (less than $10)
Total for the project: $213.45

I got a quote from a local guy for $1,600 to create skirting for our fifth wheel. Yikes! If you’ve priced professionally made trailer skirting, you know that $213 is a great deal.
Determining how much vinyl to order
To figure out how much vinyl to buy, I measured the total distance around the RV (including slides and gooseneck) and the height from the ground to the top of where the skirting would need to come. Then, I ordered tarps that were either already the correct height or double the height and could be cut in half lengthwise to the correct height.
There was a lot of math involved, and I recommend drawing out the pieces you need and how you’ll cut them on a piece of paper.
Measure twice and cut once, as they say!
Overview of the RV Skirting Installation Process
Here’s a quick video overview of the process:
Cutting the Billboard Tarp Vinyl
This is what the billboard vinyl looks like all laid out. It literally used to be a billboard. The black side is the back; the other side of this piece had a Cracker Barrel billboard printed on it.

The first thing we did was to cut the vinyl into the sizes we needed. Calculate and measure carefully!
Last year, I made a few mistakes in my calculations, and we had to order more vinyl, which meant paying double in shipping charges. ?
The vinyl cuts easily with scissors. We cut this piece in half lengthwise to make two long pieces of skirting.
Applying the Adhesive Hooks
Below you can see the adhesive hooks on our RV left over from last year’s DIY skirting.
(When we put them on, I didn’t think about how the ones on the sides of the slides would interfere with bringing them in. If we need to bring the slides in, we will need to remove those hooks.)
As you can see, we opted to place the hooks as frequently as possible. Since the hooks are cheap, we wanted to ensure that our skirting would be secure enough not to be blown away in storms and trap as much air as possible under the RV.
These hooks are extremely sturdy. I considered removing mine over the summer and had to use pliers to pull one off. It was so difficult to remove I gave up on the project and kept the hooks up for the next winter.
However, once the hook was removed, there was no damage or residue left behind on the fiberglass part of the RV. If you do want to remove your adhesive hooks, an inexpensive heat gun and plastic putty knife should easily remove them. Goo Gone is also fantastic for any residue left behind!
Alternatives to the Adhesive Hooks
If you’re thinking about doing this project but don’t like the idea of using adhesive hooks, I have seen some people who used heavy-duty Velcro instead. But I don’t really see how that would be any better since it is also adhesive.
Velcro is also more expensive than hooks. It has the advantage of forming a seal all along the top of the skirting, whereas our skirting has small gaps at the top that may allow some warm air to escape.
Some people have also made their vinyl skirting and hung it with adhesive snaps. That many snaps quickly get pricey (IMO), but that is an option, though not without some problems to anticipate.
I am considering ordering some adhesive snaps for the area covering our propane tank access doors, though, so we can easily refill our propane tanks.

- Made from black poly-carbonate
Another alternative might be acrylic mounting tape to stick the same hooks to the slides. This tape stays put in cold weather (as I explained in this blog post) yet it is very easy to remove.
I might even suggest trying it for all of the hooks if you’re concerned about the hooks being difficult to remove later, especially since the clear hooks do turn yellow in the sunlight over time.

DON’T Try These Alternatives for Hanging RV Skirting
Last year, we originally tried hanging our skirting with heavy-duty suction cups, but even after following all of the instructions for using them (cleaning the area, applying in temperatures above freezing, etc.), they wouldn’t stay stuck. So, after attempting a few options, I highly recommend the adhesive hooks we used.

Below is why you don’t use duct tape on your RV! I learned the hard way.

Last year, we used Gorilla duct tape for some of the tricky spots, and it left quite a mess.
If I need to use tape on my RV in the future I will use foil HVAC tape as it can withstand any temperature and supposedly comes off cleanly.

- Versatile Aluminum Duct Tape: This aluminum duct tape is ideal for sealing HVAC systems, ducts, and pipes or for temporary repairs on metal surfaces. It excels in tasks requiring duct tape heavy duty waterproof and heat resistant tape
Installing the Grommets
Here’s the skirting hung from the hooks with a grommet. We folded the top of the vinyl over about four inches to make it sturdier and neater.

With our hooks already hung, we used the grommet punch to punch holes as we hung it—no marking or measuring required. This method was significantly easier than measuring or marking where to add grommets. And it was worth the low cost of the east-to-use grommet punch!

We also used grommets along the bottom of the vinyl along with the tent stakes to keep the skirting in place. Sometimes this skirting with the tent stakes along the bottom comes unhooked in a few places and has to be rehung after very strong winds, but it does a much better job of staying put than alternatives, like the year we used water jugs to secure the bottom.
If a grommet rips the vinyl or pulls out of its hole, I plan to use black Gorilla duct tape to cover and reinforce the torn places and then redo those grommets. To prevent this from happening, I would suggest that you really make sure your grommets are tight and possibly reinforce the holes with a piece of black duct tape before you punch them.

Fastening the Skirting Along the Bottom
After we got the skirting hung along the top, we went around the bottom punching holes and pounding in tent stakes.

By now you can see how buying pre-cut vinyl with grommets already added would have saved us a lot of time!

Going Around Tricky Areas
We cut and folded the skirting to go around vents and other things we didn’t want to cover.


How We Joined the Seams Between Two Pieces of Vinyl
For the seams between pieces, we overlapped them by several feet.
Last year we tried using Gorilla duct tape to tape the seams together and it did not stay. It ended up coming untaped, blowing around in the wind, and making a sticky, dirty mess.
Overlapping the skirting without actually joining it worked just fine this time because we fastened each piece to the RV and to the ground. If you are concerned about making a tight seal you may want to find a different way to join the seams (see the idea suggested at the end of this article).
I planned the seam in the photo below to be at the spot where our sewer hose connects so that it can be easily unhooked if we need to access that area.

Skirting the Stair Area
Going around the stairs was tricky. I took the vinyl across the front underneath them, then added a second piece to line the area behind the steps, hung from adhesive hooks I stuck to the steel frame.
I decided to use a heavy-duty clear shower curtain (which already had grommets!) weighted down with a few bricks instead of tarp vinyl to line the area behind the steps because our cat loves to play under the RV.
Skirting Around the Fifth Wheel Gooseneck
The gooseneck of a fifth wheel can be where the most cold air and wind enter an RV. It demands the best skirting… And it’s the hardest to skirt.

Unfortunately, our skirting didn’t do much to prevent wind from entering through the walls, so it still got pretty cold even with the skirting. I ended up lining the walls of our closet with a type of foam wall covering for extra insulation.
Related: 6 Ways You Must Prepare Your RV For Winter
If I had it to do over again, rather than try to make my own skirting for the gooseneck area, I would just purchase a fifth wheel skirt like this:
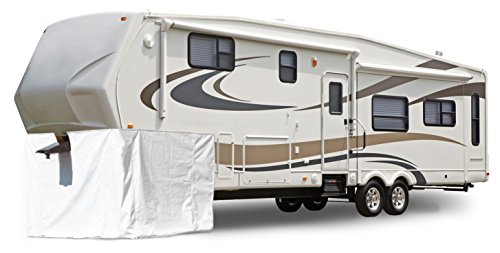
- Fifth wheel skirt turns wasted space into a useful storage area under your fifth wheel overhang. Great for outdoor furniture,bikes and other gear.
Adding a zipper to access the storage area under the gooseneck
To access the front storage area without having to remove the skirting fully, I decided to add a zipper. Instead of buying a surprisingly expensive long zipper, I surgically removed the zipper from an inexpensive garment bag. This is an extra-long garment bag designed for wedding dresses.

I ended up cutting more off the sides until I had about six inches of plastic on either side of the zipper. Two inches on either side of the zipper would have looked better. You need just enough to stick tape to.

Then I taped the zipper to the back of the skirting using extra wide Gorilla duct tape.

Next, I cut a hole in the front of the skirting over the zipper.

And now I have a zipper opening for my skirting.

Here is our RV with its 5th-wheel skirting, all ready for cold weather!

Ideas from Other RV Owners
RV owner, Rob, allowed me to share photos of his skirting, along with some additional ideas he came up with:
Idea #1: Sandbags Used to Weight the Skirting Down on Concrete
Rob used sandbags from Amazon and filled them with sand from a local supplier to weigh down the skirting. Parked on a concrete pad, he couldn’t use tent stakes.
He says his skirting was able to withstand a wind gust recorded nearby at 52 mph without even budging! (Other RVers use pieces of lumber to weigh down their skirting.)
Idea #2: Snaps Used to Join the Skirting at the Seams
Rob used snaps and a snap tool to attach the skirting pieces to each other. I love this idea!
If you don’t mind screwing into your camper, you could also use screw-in snaps to hang the skirting. I was too afraid I would make a mistake and end up with a bunch of holes in my RV. But Rob’s turned out great!


Idea #3: Skirting Over the Stairs and Adding a Porch
Rob avoided the tricky issue of how to skirt around the steps! He folded in his steps and covered them by building these steps using free pallet wood instead.
I think Rob’s skirting looks really sharp!
Idea for Creating Access to Storage and Mechanical Components
Here’s another idea from an RV owner named Guy Hoffman. He went ahead and covered his storage access doors with skirting but created a flap that opens for access and stays closed with the use of magnets.
If you end up making your own skirting and come up with any more great ideas to share, or if you have any questions for me about our skirting, please leave a comment below! 🙂
Looking for a cheaper option? Consider foam board!
The project was actually easier and cheaper than the vinyl skirting ($106 plus tax for materials) and we like how it ended up looking. I wrote an in-depth tutorial detailing the process, which you can read here. We also made a video to demonstrate the process as we made the skirting:


Ashley Mann founded RVinspiration.com in 2017. She handed off the website to new owners in 2022 to launch a new business as an online entrepreneur coach, but she still helps out as the blog editor. Ashley spent three years living full time in a 38-foot, 5th-wheel RV with her husband Josiah and their cat, Kitty. Her favorite thing about RV life is the challenge of finding the perfect way to organize a space, and she loves seeing all the creative and clever ways people come up with to customize their RVs.


Hello!!
We are going into cold weather and I had the same idea with, used sign vinyl. Then my wife said this couple has alot of the same ideas you do…haha..its true!! Love your post!!! What millimeter did you get? 11? 15? 17? So glad it works!! Thanks again!
-Kermit
Hi! 🙂 We used the 9 oz. / 11 mil vinyl last year and again this year. There were a couple of places last year where the vinyl wore through because the wind blew it up against a sharp corner, but hopefully that won’t happen this year since the skirting is staked down unlike last year. If it does, though, I will probably just patch it with black Gorilla tape.
I think a few people have used the 20 mil pond liner, but I think the 9 oz does its job of blocking wind and keeping heat from escaping just fine for us, at least in Kansas City where we are located. It’s still pretty heavy, and when I ordered a sample of one of the professional skirting brands, the weight was comparable.
One other thing I will mention is that there are a few places where the grommet pulled partway out of the hole punched in the skirting where I staked it down because it was pulled so tight by the tent stake, but I think that may have been more due to the grommet not having been squeezed tight enough rather than the weight of the vinyl.
What size billboard tarp did you get? I see several different sizes and I’m unsure how to measure my travel trailer to know how much I need.
I think you’re asking about the dimensions of the tarp I ordered rather than the weight, but just in case, we got the 9 oz / 11 mil weight. As for the dimensions, I ordered multiple pieces which I cut and spliced together. To figure out how much I needed, first I determined the height the skirting would need to be by measuring from the highest point, which for us was on the sides of our slides, and allowing a few inches to fold over on top and about a foot extra on the bottom to stake down. Instead of making it the same height all the way around (which many people do), we decided to make the skirting shorter where the cargo storage doors were located to avoid having to cut holes for access. Also I measured the piece for the gooseneck separately. After that I measured the length needed of each height by just walking around the RV with a tape measure. After I had the dimensions I needed, I looked for pieces to buy that had approximately double the height and half the length, planning to cut it in half lengthwise. Of course the exact dimensions will be different for each RV, but I find it helps to draw the tarp on a piece of paper and mark where it will be cut in order to figure out how much to buy without wasting too much. It can definitely make your brain hurt to figure it out. Hope that helps.
Hey there! My wife and I are going to do this same thing as we have a friend who can hook us up with the billboard vinyl for free. Just wondering how much you used? How big was your billboard vinyl? We have a smaller camper than you guys at about 32′ so I would think whatever you all used would be sufficient for us. Thanks so much!
This year I ordered two tarps, a 26’x10′ piece for the gooseneck, and a 47’x10′ piece which I cut into four pieces to make the rest. The dimensions of those four pieces were 47’x5′, 27’x5′, 10’x2.5′, and 10’x2.5′. The 10’x2.5 pieces were used for the front half (before the gooseneck) where we didn’t skirt up so high, but if you are in an extremely cold climate I might recommend going ahead and going up the full height because there is a bit of a gap along the bottom edge of our camper in that section that I’m sure allows some wind to get in.
Last year I accidentally ordered too little skirting, and that is really frustrating, so I would suggest measuring to be sure you have enough. To determine how much you need, figure out how tall it needs to be at the highest point (don’t forget you might want to fold it over along the top edge and will want extra along the bottom), then measure the distance around the RV (including going around slides). I was able to find a piece to cut that was half the length and twice the height, plus a few extra feet for good measure.
Good luck!
Ok folks, I would like to try this idea but no one gave the website or contact information on where to buy the billboard sign tarps.
The website is linked in the list of supplies at the top of the blog post! 😉 But, you can click here to get to it too!