
23 Must-Do’s Before Storing Your RV for the Season
This post may contain affiliate links.
With fall peeking around the corner, many RVers are making plans for storing the RV for the season. Before you can apply the parking brake, there are a few preparations to keep your camper in good condition and free of pests while it’s stored.
In this article, we’ll cover 23 must-dos before storing your RV for the season. Before we start cleaning, let’s start with where you can store your RV.
Where should I store my RV?
Finding a place to store your RV can be a headache, but there are multiple options.
If you have the space and your HOA allows it, many travelers store their RV in the driveway or on their property. This is especially handy if you plan to take your RV on trips throughout the fall and winter.
But for most, you’ll be searching for RV storage in your area. Many storage places offer storage for RVs and trailers. Though it is usually uncovered, this is a good option if you’d like your RV to be locked behind a gate and protected by the storage company’s security system.
If you can find an RV storage business in your area, you’ll likely be able to find covered storage. Covered storage is ideal for RVs to protect the exterior from weather and sun damage. Covered storage will be more expensive than other options, but can extend the life of your RV’s exterior. RV storage is in high demand, so call ahead to secure a coveted covered parking spot.
The latest trend in RV storage is interior storage at places like National Indoor RV Centers. These storage facilities receive rave reviews and are in major hubs across the country, including Las Vegas, Dallas, and Atlanta.
These types of storage facilities typically offer additional services, like prepping your RV for travel by reconnecting your batteries and starting your fridge. This is your most expensive storage option!
If none of the above options are appealing or available to you, Neighbor is a storage marketplace that helps you find storage options in your area. Put in your zip code to find options near you.

Once you know where you’ll be storing your RV, it’s time to start cleaning and preparing it for storage. Grab some cleaning supplies—you’ll need them to complete these steps!
Should I cover my RV?
With covered storage costing a premium and hard to come by, you’ll likely need to store your RV uncovered. We recommend covering your RV roof, tires, and windshield to prevent wear and tear. Tires are extremely expensive to replace on RVs and should be covered while in storage with RV tire covers.
If you’re concerned about leaks of any kind, consider covering your RV roof with an inexpensive roof cover.
1. Shake out rugs.
If you keep any rugs in your RV, shake them out outside to clear out dirt and debris. If you have a washable rug, toss it in the washing machine to give it a good deep cleaning.
2. Sweep and mop floors.
With those rugs out of the way, sweep and mop the floors as usual. A Swiffer is great if you have slide outs in your RV as it can sneak into the small space between the floor and the slide.
Pay attention to any rubber seams along the bottom of the slide along the floor. It’s easy for food to get trapped here and attract unwanted pests.
3. Clean floor vents.
Heating vents in your floor can easily trap dirt and dust. Remove the vent cover and vacuum these. You can also use a microfiber cloth to wipe up any remaining dirt.
Close your floor (and ceiling!) vents after cleaning.
4. Clean the bathroom.
Clean the bathroom by sweeping and mopping the floors, wiping down surfaces, and cleaning the sink, shower, and toilet. You know the drill!
Remove any toilet paper or paper towels or put them in a closed cabinet. Should you end up with mice in your RV, they will tear up toilet paper to make nests, creating a giant mess in your rig!
Remove any soaps or lotions and anything that may be negatively affected by the variable temperatures.
5. Clean the shower door tracks.
Commonly overlooked spots in the RV bathroom can become a growth spot for mold and mildew. The shower tracks are one common place for water and bacteria to get trapped. A spray bottle with vinegar and Dawn soap diluted with water will help remove and kill germs in these tiny tracks. Use a sponge or small rag to wipe the inside of the tracks. If your shower door tracks are especially skinny, a sponge paint brush will fit great!
6. Thoroughly dump and cleanse your black tank.
Empty your black tank—of course. After dumping, rinse the tank with water by running your toilet to fill the tank. Use a black tank cleaning product like Clean-It which is designed to deep clean and break down everything in your tank. Let the solution soak in your tanks for a couple days for best results. Then dump your tank as usual.
If you will be in freezing temperatures, properly winterize your RV tanks.
You can also fill your black tank with water and add a storage treatment like Store-It to eliminate odors during storage. Only do this if you won’t be storing your RV in freezing temperatures.

- RV black tank cleaner for storage in non-freezing conditions, designed to work for days or months between trips; safe for extended use and will not damage seals, valves, or tank components—the longer it sits, the more it cleans
7. Cleanse and dump your grey tank.
Before storing your RV, consider deep cleaning your grey tank. If you’ve never done this before, don’t worry—it’s a hassle-free process.
Close your grey tank and fill it full of water. Using a grease cleaning soap like Dawn Ultra, pour soap down your sink drains. Unique Camping Marine recommends using at least 20 ounces of soap. You can split this up between every drain in your RV to make sure all of your pipes are coated and cleaned.
Let the soap spread through your pipes and tank and break down built-up residue. Do this at night and let the soap work while you sleep.
In the morning, open your grey tank and empty it. You may see gunk and grease come out of your tank. For an extra layer of cleaning, you can rinse the tank by letting it fill completely and dumping it again.
8. Empty the freshwater tank.
Freshwater tanks should be emptied after each trip and before storing. Always store your freshwater tank completely empty.

9. Remove all food items from the camper.
Remove all food from the cabinets, drawers, fridge, and freezer. In your cabinets, follow up with a Dust Buster to vacuum up any crumbs left behind. I always find broken bits of spaghetti noodles in the back of my cabinets!
Turn off the fridge and leave the doors open as you’re removing everything to let it begin to thaw. Lay a small towel in the freezer to collect moisture.
10. Clean the refrigerator.
One of the most common issues people encounter after bringing their RV out of storage involves the fridge. Food or food particles left behind have turned to mold and ruined the interior. This creates a huge mess that requires a lot of effort to properly clean, but this can be easy to avoid.
Step one is remembering to remove all the food. It’s an obvious step, but an easy one to forget—especially if you’re in a hurry to get the RV stored!
Then spray and wipe down all of the shelves and baskets in your fridge and refrigerator with diluted vinegar. A 1:1 ratio of vinegar to water will work well. Wait to complete this step until your freezer has thawed.
11. Keep out rodents!
You’ve cleaned most of the culprits that attract rodents at this point. Consider grabbing some natural rodent repellent to keep pests away from your clean RV. I use this one, which doesn’t leave a lingering bad smell like the commonly recommended mothballs do.
12. Clean your A/C filters.
Your air filters in your air conditioning unit(s) should be cleaned annually and what better time than when you’re already deep cleaning the RV?
To clean the filters, remove the interior cover and take out the filters. Vacuuming the filter can remove much of the debris the filter has caught. For a deeper clean, soak the filter in warm water with a little Dawn soap for 15-20 minutes. Remove from the water and brush it gently to remove any dirt particles.
Filters can be easily torn or broken, so be sure to complete this step with care.
13. Extend your awning.
Awnings have the pesky ability to trap a lot of moisture in the rolls of fabric. This can happen in damp weather, but also if you’re running the air conditioner and moisture is running from your A/C toward your awning. Extend your awning and let it dry completely before rolling it up for storage.
This is an easy step to skip when storing your RV, but a common place to find mold and mildew!

14. Close and lock the windows.
Don’t forget to check all of your roof vents!
In certain climates, it is recommended to leave a vent cracked during storage to allow for airflow. But this is one way for pests to easily enter your rig and even cracked, wind can cause windows to open more than intended. I personally always close and lock every window!
15. Close all blinds and curtains.
16. Turn off batteries.
Or better yet, remove them completely. Remember to remove the negative end first.
Freezing temps will negatively impact a battery’s lifespan. To best protect them, remove the batteries and store them in your garage while your RV is in storage to keep them in tip-top shape.
17. Cover your tires.
This inexpensive step is one of the most important on this list. Tires will be affected by exposure to the sun when stored outside. This can cause weather cracking and damage the tread.
Replacing your RV tires—if you’ve never had the pleasure before—is ridiculously expensive. Protect those tires if you’ll be storing your rig outdoors.
Covers and All is a good place to look for these, particularly if you need a custom size to cover your tires, but you can buy a set of four from Amazon too.
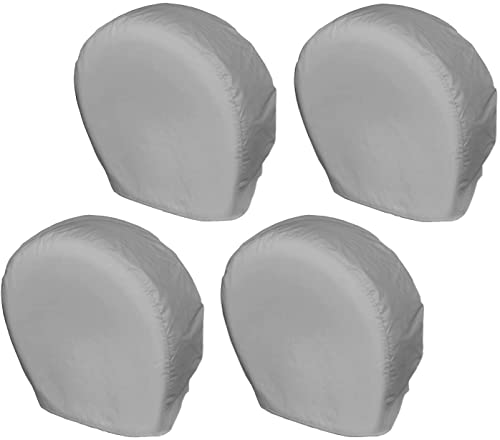
- Universal Fit - Refer to our fitting guide picture for size selection, set of 4 covers fits entire tire diameter up to: 23''-25.75'', it’s NOT the rim size. Any questions can seek solution from us by email.
18. Lock all of the exterior bay doors.
If you have a trailer or fifth wheel, you may consider using a hitch lock as well to prevent theft.
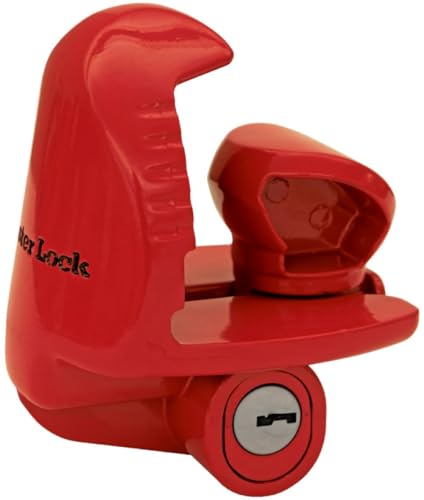
- Coupler Lock,Universal
19. Cover exterior vents.
If there are any vents left uncovered, for example thehot water heater, refrigerator, generator, etc, consider covering these to keep out pests and dirt.
20. Winterize your RV.
Below-freezing temperatures will wreak havoc on an RV’s systems if it isn’t correctly winterized! Don’t skip this step if you’re storing your RV for the full winter season.
Follow the checklist: How to Winterize Your RV
Extra steps for Motorhomes
If you have an engine onboard your RV, there are a few additional items to consider.

21. Fill your gas tank before storing.
The less air in the tank during storage, the less likely you are to have any condensation issues within your engine.
Camping World recommends starting your motorhome once a month while it’s stored to protect the entire. You can also use a fuel stabilizer to prevent the fuel from deteriorating. Add the fuel first, then the stabilizer, and then drive to your storage location. Letting the engine run with the stabilizer added will ensure it is circulated throughout the engine.
22. Change your oil
This one might seem silly, but dirty oil sitting in your radiator can cause it to deteriorate. Get a quick oil change before storage and it’s one less thing to worry about when you’re prepping for your next trip!
23. Cover your windshield.
In addition to protecting the glass from the elements, a windshield cover will protect your dash from sun damage.
Final Tips
This may sound like an exhaustive checklist, but taking care of these items before storing your RV will help your first camping trip of the season start on a good note!
One last thing to consider: take care of any maintenance that you’re aware of before storing. If there are any roof leaks, loose seals, or anything that might worsen while exposed to the elements, get it fixed prior to storing.
There is no need to use your leveling jacks to stabilize the RV while storing, so don’t worry about that! Park your camper and in the case of towables, chock the wheels.
For more information about how to prepare your RV winter, check out our cold weather RVing resources.


Alyssa Padgett is the author of the best-selling book, A Beginner’s Guide to Living in an RV. She loves all things #RVlife and travels full-time around the globe with her family of four.


What about your mattress, how is the best way to winterize it?
I’ve never heard of anyone winterizing their mattress!
I place slats under it for air, cover with plastic on top, followed by a white bedsheet. This ensures if any mouse were to actually get in, mattress is protected from mouse urine, and I can tell immediately if one has gone over the mattress.
I have had 2 mice under kitchen sink over 8 yrs, and took immediate action to rectify any entrance points. Problem solved quickly. Good maintenance always required.
I’d add one more thing to this list and that’s add Damp Rid containers to several places in the rig for winter storage. Moisture left in the rig is bad.
Yes that is a great one!