How to Insulate RV Walls with Faux Wood Plank Adhesive Panels
This post may contain affiliate links.
Campers and motorhomes are notorious for having thin walls without much insulation. This keeps them lightweight but also means it’s hard to keep them warm in cold weather. To stay warm all winter and even keep cooler in summer, you can easily insulate RV walls and give them a beautiful makeover all at once.
In the winter, I noticed that the walls in my RV closet in my fifth wheel were particularly cold. The cold walls can cause condensation to form, which can lead to mold or mildew.
We’ve been fortunate not to have had any serious problems with condensation during the three winters we’ve spent so far in our Keystone Everest fifth wheel. But there is one place that gets colder than the rest of the RV—our bedroom closet.
Last year I taped some Reflectix to the back wall of the closet to try to help hold in some of the heat. I’ve since heard people who battle condensation in their RVs say condensation can become trapped behind the Reflectix, so I decided that wasn’t a method I wanted to recommend.
Plus, it wasn’t exactly homey.
Then a few months ago, one of my subscribers told me about a way she increased the insulation in her RV closet.
I loved the idea and decided to try it myself, and that’s what I’m sharing in this blog post.
Video of the Project
Here’s a video overview of the project:
What I Use to Insulate RV Walls
The key to this project is an adhesive decorative wall covering from a company called Arthome.
The beauty of this type of insulation approach is that you can choose a wall covering that matches your design aesthetic and slow down heat loss at the same time.
Update: The brand I originally purchased is no longer available on Amazon, but there are many other designs of foam paneling available!
- 【100% SATISFACTION SHOPPING】: 3D wall panels safety and environmental, brick pattern effect, simple and modern style. “Contact Seller” if you are not happy with the purchase or have any questions. Our Excellent customer service will leave you with no worries after you purchase it.
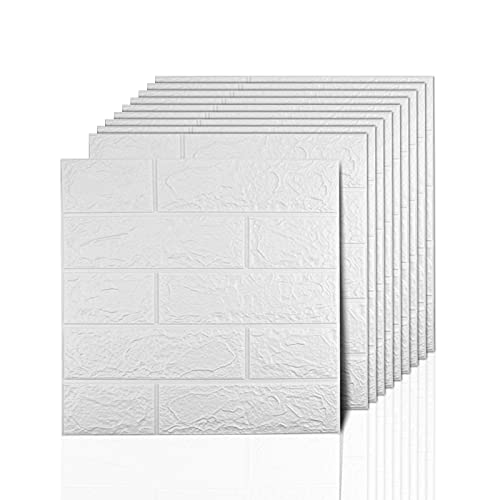
The adhesive panels are made of soft PE foam about 1/4″ thick covered in plastic. They come in several styles, including gray or brown faux wood planks (sometimes called “shiplap”) or white faux brick.


The foam creates a 3-D textured effect that looks very realistic, and in fact, I’ve seriously considered buying more to create an accent wall in my RV. I think this would look especially good on the headboard area of an RV, in a small bathroom, or lining the walls of a slide-out.
If you’re looking for a way to create the look of a brick or shiplap wall in your RV but want something that looks a little more realistic than wallpaper, I definitely recommend this product.
However, I wouldn’t use it near a stove cooktop since it’s made of plastic and could melt (check out this post for kitchen backsplash ideas) I also wouldn’t count on being able to remove it later, as the adhesive is very strong.
Because the panels have a plastic coating, they would be easy to wipe clean, and according to the product listing, they are resistant to moisture.
Because the adhesive is so strong, I’m not worried about condensation getting underneath.
Description of the Adhesive Foam “Shiplap” Wall Panels
Here is what the product looked like out of the package:

In this close-up photo you can get a better idea of the thickness and the type of material:

The panels have a paper backing you peel off to expose the adhesive.

Step 1: Measuring and Cutting the Panels
The first step was to measure and cut the panels to the correct size. “Measure twice and cut once,” as they say!

I started out using an X-acto knife over a cutting board to cut the material, but later I started using a pair of sharp scissors and those worked well too. I think I would recommend using a box cutter/utility knife for long, straight cuts, and scissors for trickier parts with angles and curves.

Another Close-Up View
Here is what the cut edge of the panels looks like. You can see the type of squishy foam they’re made of:

Step 2: Prepping the RV Walls Before Installation
Following the product instructions, I cleaned the walls of my closet. I just used a microfiber cloth damp with water to remove any dust particles since the walls of my closet weren’t really dirty.

Step 3: Installing the Adhesive Panels
Then I started sticking it to the walls.
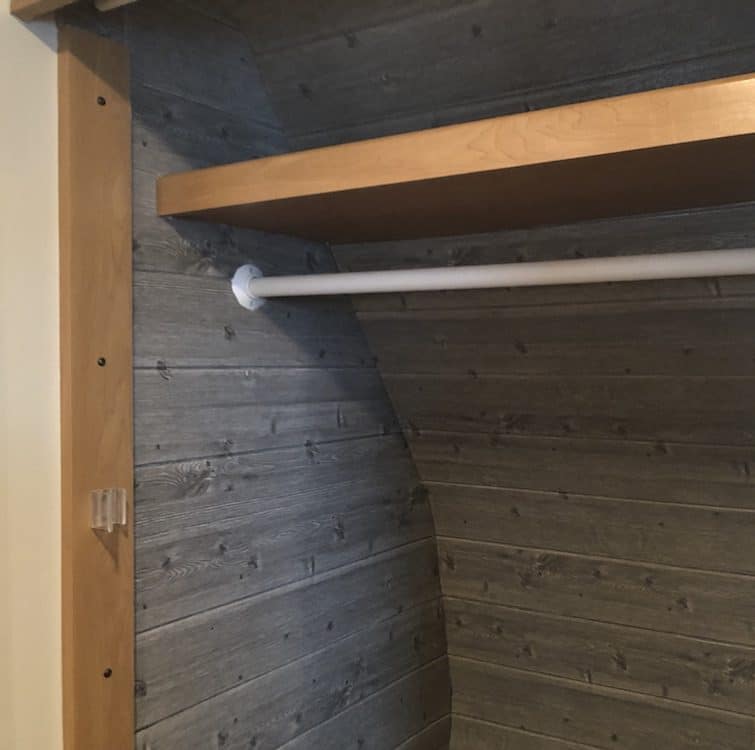
I decided to run the “planks” horizontally so that the foam would easily bend with the curve of the wall. I like this look better anyway.

Even though the adhesive is very sticky, I was able to carefully pull the panels away and reposition them if needed. However, I ended up ruining an entire panel when it accidentally became stuck to itself! Trying to pull it apart caused it to tear, so be careful not to let that happen!
After I installed the first one, I learned with the second one that it was better to start at the top and leave the extra inch or so of space at the bottom next to the floor. That way the narrow strip I cut to fit in the gap would be less noticeable.

Step 4: Tackling Tricky Parts of the Installation
I had to cut a narrow vertical strip for the 6-inch gap in the middle of the closet. I decided to do it the easy way rather than cutting the panels so the lengths of the planks appeared staggered.

It’s pretty visible, but I don’t mind since it’s hidden behind clothes in my closet.
The hardest parts were the walls with a curved edge and going around the closet pole. But since the material bends, I was able to position it with the backing still on, squish it into place, and then cut along the curve.
I probably would’ve measured more carefully if it was somewhere more visible than the back corner of my closet. Because of the curve, this was a much easier approach to measuring and cutting.

Going Around Tight Areas
Because the foam is sort of squishy, it’s very forgiving of mistakes. You can squish a small piece in to patch a gap and it will expand to fill the space. This is what I did so that the panel could slide in over the closet pole.


It’s not perfect, but it’s a huge improvement over the beige wallpaper! I always regretted not painting the closet when we painted the walls in the rest of our RV.
Below is an up-close look at the 3-D wood grain texture of the product. To me, it looks very realistic and I love the color!

The Completed Project
Here it is finished! The whole project only took me a few hours, even with stopping to take pictures. And in case you’re wondering, I ended up using about 8 1/2 panels and bought two packs of 5 panels.
I would’ve had a full panel left over had I not accidentally ruined it. I still had enough partial pieces left that I plan to line the inside of my bathroom medicine cabinet.

Here’s how it looks with my clothes put back in, which I took the opportunity to sort and organize.

Read next: 15+ Clothes Storage & RV Closet Organization Ideas
Final Thoughts
So do the foam panels actually keep my closet warmer? I can’t really say definitively because I wasn’t able to measure the temperature before and after.
But it’s 33 degrees outside right now and the walls don’t feel cold to the touch. Maybe it’s my imagination but I think it feels less drafty as well.
I am so happy with the way this DIY project turned out just based on looks alone that for me it was worth it regardless!
For more ideas to help you prepare your RV for cold weather, check out my Cold Weather RV Resource Page.
Ashley Mann spent three years living full time in a 38-foot, 5th-wheel RV with her husband Josiah and their cat, Kitty. Her favorite thing about RV life is the challenge of finding the perfect way to organize a space, and she loves seeing all the creative and clever ways people come up with to customize their RVs.



Looks nice….we are in south west Florida. Our problem is heat not cold. I am wondering if this would work here. Our trailer is used mostly in the hottest time of the year. We volunteer at a state park from April until October. I will have to check it out. Love the gray. Thanks for the info.
Hmm it might help insulate regardless of whether you’re trying to keep it warm or cold! Do you put Reflectix in the windows that the sun is coming straight in? I find that does help! Though we finally broke down and got a free standing air conditioner from Lowe’s last year. It was the only thing that finally kept us cool enough.
Hi Ashley, thank you for your post. I did something similar with moisture resistant foam from Lowe’s. It’s a little thicker. I planned on using wood grain contact paper to cover pink panther. 😉 However, this stuff just may have changed my mind! 👍🏼
PS: I’ve submitted a question on Amazon to see what they say about using this on RV floors. I have a tiny motorhome. The floors get super cold! What do you think? Puncture city? 😬
I would not recommend it for floors because the material is easily punctured. I’d go with an insulating underlayment under regular flooring instead. If you don’t want to replace your flooring, you might try just adding some rugs to start with.
Where do you buy the foam panels?
I bought them from Amazon. See the links at the top of the post – I will try to keep them up to date if the product listing is removed!
This looks awesome but I’m still a bit concerned about condensation collecting behind the product and creating a mold problem inside the walls. Wouldn’t want to jump from the frying pan into the fire, as they say!!
I definitely don’t think I’d put it in a closet that was constantly getting damp walls without doing something else to control the condensation as well, but in combination with other condensation controlling techniques, I think it could help warm up the walls and reduce heat loss.
What a wonderful idea. I’m thinking of doing the wall behind my bed, as the head of the bed is under a window in our 35′ Motor Home… Be very functional, plus look good, too…I use shades of gray and white in that room, already and I think the color that you have used would be most appropriate….Thank you…
Sounds perfect! Would love to see a picture if you end up doing it!
What a clever idea. Never knew this foam existed!! Do you think it would work on the ceiling in our RV? We have a 2005 and it has the carpet like stuff on the ceiling ( not sure of the real name for the stuff!) wanting to remove it it at some point and replace it with something. Any thoughts would be great!
Hmm I think it could work; the only issue I can think of would be that the seams between the panels might not look good unless you cut them to make the “boards” look staggered. And if your RV is very big, that much material might be expensive. Maybe order one pack and test it before deciding for sure?