How To Design Your RV from Start to Finish
This post may contain affiliate links.
Whether you’ve just bought your RV or are finally getting around to making your old one feel like home, deciding to design your RV can be an exciting time. There’s so much potential, and you’re determined to create an epic before and after transformation like the ones you see online.
But when it’s time to take action, where do you even begin?
Although it’s exciting, designing your RV can be a daunting and overwhelming task if you aren’t sure where to start. In this article, you’ll learn what steps to take and tips for making your RV redesign as easy as possible.
We’re here to give you our best RV remodel ideas to help you define your style, create your vision, and bring your ideas to life.

Customizations: Identify Your Needs and Wants
So, first things first: where do you start when remodeling an RV?
Before jumping into all the exciting changes you want to make, let’s take a step back and look at the big picture. What’s your current situation, and what role does your RV play in your life?
Needs
Start by figuring out what your RV absolutely must have. These are your non-negotiables. Here are some questions that will help you pinpoint your RV’s needs.
What is your living situation?
Are you living in your RV full-time? Planning to take it out for trips that last a few months? Will it be used for weekend camping trips a few times a year?
Whatever your situation, keep this in mind when making decisions.
How many people (and pets) will you need to accommodate?
Will you be traveling solo or with your partner? Packing up the whole family – kids, partners, dogs, and all? Planning to invite guests along for the ride?
Knowing how many passengers you expect will help guide your decisions regarding storage, beds, seating, and more.
Many RVers choose to optimize space for kids or guests using bunk beds.

Will you be working from the road?
If you’re planning some extended trips, chances are somebody will need to work remotely. Maybe you’ll be working from the road, or maybe the kids will need to complete assignments for school.
Make sure your setup suits your needs, including internet capabilities, a comfortable office space, and storage for work or school supplies.

Other needs to consider
Climate: Don’t underestimate the summer heat, especially if you plan on traveling where the temps regularly reach 100°F or hotter. Check out this list from KOA on ways to heat-proof your RV.
Accessibility: Do you or your family members need any special accommodations? For example, if someone travels in a wheelchair, you’ll want to plan for ramps, wide walkways, and anything else to ensure they’re comfortable on the road.
Wants
Now that you’ve nailed down your RV’s needs, you can move on to the fun part – what do you want for your RV? Come up with your list of “nice to haves.”
What outdoor activities will you need storage for? Will you need somewhere to store a bike, tennis racquets, or fishing gear?
What indoor activities or entertainment will you have on the road? Where will you mount your TV and store your stack of books?
What parts of your routine do you want to prioritize? If you can’t start the day without a good cup of coffee, consider adding a coffee nook. (Check out this article for space-efficient coffee ideas.)

These might feel more like finishing touches than something to plan for upfront. But having an idea of how and where these elements will fit in your RV will help you pull it all together in the end.
A Final Note on Customizations
Maybe there’s a big project you’re dreaming of down the road, but you don’t have the time or money for it right now. Before putting all your time and effort into your current RV renovation, consider your long-term goals for the space. Try to make changes that are not at odds with what you might want later.
Research and Inspiration
Finished with your list of needs and wants for your RV? Great! Now it’s time to find some inspiration to bring your vision to life. Consider this your permission to dive into social media, blogs, and TV shows to gather ideas. You’ll also want to dig into the nitty-gritty details, like your RV’s make, model, and dimensions.
Inspiration
If you have an eye for interior design, you may already have a crystal-clear idea of your end result.
However, if you’re like many of us, your interior design knowledge consists mainly of snippets of advice you’ve heard on HGTV. In this case, seeing what others have done with their RVs can help you decide what you want your final product to look like.
Sometimes, identifying what you don’t want can be easier than deciding what you do want. If you’re struggling to make decisions, list colors, materials, objects, and styles you don’t want in your RV, and narrow it down from there.
If you’re a beach bum at heart, consider a bright coastal feel like this style by Suzanne Taylor.

For a timeless pragmatic style, consider a contemporary design like this one by Victoria Jones.

Some RVers opt for a rustic farmhouse feel like this one by Robyn Crowhurst.

Here are some great places to find inspiration:
Social media: There are plenty of RV pages to check out on Instagram, YouTube, Pinterest, and TikTok.
Blog posts: Many RVers have gotten creative with their RV redesigns and love sharing their lessons learned and finished products. Check out some of our other posts to get started, or Google your own ideas to see how others have done it.
TV shows: In the age of streaming, the options are nearly endless. Look for interior design shows that focus on small spaces like tiny homes. Despite the obvious differences between tiny houses and RVs, many of the same principles will apply when working with a small space.
Research
While finding inspiration is all about picking out pieces you love from other people’s designs, the research phase is a matter of knowing your RV inside and out. You’ll need to know things like the make and model of your RV, the dimensions of your interior, weight limits, and what items need to be replaced (more on that later).
This might feel tedious, but giving your RV a makeover is a big undertaking. Trust us, ironing out the fine details can save you a lot of time, money, and headaches down the road.
Now is also a good time to get a rough estimate of what everything will cost and make sure all your plans fit within your budget. If you’re dying to make some changes but don’t quite have the budget to match your enthusiasm, check out these 23 ways to give your RV a makeover on a budget!
Design Your Layout
You probably have a general idea of what rooms will be what. Unless you’re planning some major structural renovations, the kitchen will stay the kitchen, the bathroom will stay the bathroom, and so on.
But now it’s time to start thinking about specifics.
What couch will you add to the living room, and how much room will it require? Will you keep the existing countertops or install a new one? Are you planning to remove cabinets or shelves from the bedroom to free up space?
The more specific you can get about your design plans, the less room there is for surprises (and unexpected expenses) later!
Tips for designing your layout
Identify zones: Divide your space into zones based on their function. Designate zones for sleeping, cooking, eating, and lounging.
Optimize space: Think about areas that can serve multiple purposes. For example, you might install a kitchen table that converts into an extra sleeping area.

This clever RVer created a lounging area that doubles as a workspace.
Revisit your needs and wants: When designing your layout, plan for everything you identified as a need or a want. Starting with those elements and working backward from there can help ensure that your priorities will be accounted for.
Some of these decisions will require careful consideration of your research on your rig. Make sure any big changes you plan to make are well within your RV’s space constraints and weight restrictions.
Tools for designing your layout
Plenty of tools available online allow you to visualize your design before bringing it to life. Many of these tools are available for free or for cheap. Here are a couple of our favorite design tools.
Best for testing colors: Color Visualizer
This tool from paint company Sherwin Williams allows you to upload photos of your space and virtually paint the walls any color.
Best for floorplan design: Planner5d
Planner5d allows you to create a floor plan and play around with the design until you find what will work for your space. There is a free version you can use to get a feel for it, but some of their best features (like access to all design elements and the ability to adjust furniture size) are only available with a premium membership, which is currently listed at $20 per month or $60 per year.
Choose Which Aspects of Your Camper to Replace or Renovate
Take inventory of the current state of your RV. What’s in good shape, and what needs a little TLC or a complete overhaul?
Here’s a rundown of common problems, along with tips to help you decide whether to repair or replace.
Walls
Common issues: Scuffs, dents, water damage.
Repair or replace? Minor scuffs and dents can be patched and painted over. Updating wallpaper or paneling can be done relatively easily. For extensive water damage or to change the look, replacing wall panels or re-covering walls with new materials (such as beadboard or shiplap) might be necessary. This can be labor-intensive but transformative.
Design tips: As a rule of thumb, light colors make small spaces feel bigger. We recommend picking a few core colors and sticking to those throughout your RV. Make sure that your wall colors look good with other elements of your interior, like furniture and flooring. If you have a theme you’re going for, consider adding an accent wall. Later, we discuss different materials you can use for your walls.
Flooring
Common issues: Water damage, warping, worn-out materials.
Repair or replace? Small areas of damage can be repaired by replacing individual tiles or planks. Laminate and vinyl flooring are relatively easy to patch. If there’s significant damage to the floor, consider replacing it and upgrading to more durable materials like luxury vinyl plank. (Read on for more pros and cons of different flooring types.)
Design tips: You’ll want to avoid hardwood in your RV, but some alternatives can offer the same polished and modern look. Be sure to choose flooring that goes well with your wall colors. Interior design experts recommend flooring undertones opposite to your walls’ color. For example, if your walls are a warm color, you may want to choose flooring that has cool undertones like blue or green. If your walls are cool, opt for flooring with warmer undertones like red or orange.

This visual from Elite Hardwood Flooring can help you identify the undertones of flooring. (Although we love this visual, remember that you shouldn’t use hardwood floors in your RV.)
Windows
Common issues: Cracks, leaks, broken seals, condensation between panes.
Repair or replace? Small cracks and leaks can often be repaired with sealant or by replacing the glass pane. Replacing seals can improve insulation. Window replacement is best for extensive damage, broken frames, or persistent condensation issues. Upgrading to double-pane windows can improve energy efficiency.
Design tips: Curtains are a cheap, easy, and effective way to add personality to your RV. You can choose from solid or patterned, sheer or blackout, store-bought or homemade. Shades and blinds can also be used to decorate or filter out light. Since curtains and blinds are so easy to install and swap out, we recommend choosing and putting them up after you’ve decided on more permanent elements like wall color and flooring.

Notice the difference in condensation between the single-paned window on the left and the double-paned window on the right. The double-paned window (done with DIY plexiglass) is doing a better job trapping the heat in the RV. Photo credit: author
Read next: 44 Ideas for an RV Window Makeover.
Backsplashes
Common issues: Stains, damage from heat or moisture.
Repair or replace? Small damages can be repaired with touch-up paint or sealant. Cleaning or re-grouting can refresh the look. If the backsplash is severely damaged or outdated, replacing it with new materials can provide a quick and stylish upgrade.
Design tips: Peel-and-stick backsplashes are an excellent option for bathrooms and kitchens. They are easy to install and come in varieties that mimic ceramic tile, wood, or brick. The right backsplash can go a long way in bringing your style or theme to life. Although peel-and-stick backsplashes can be removed, this can be a complex project. Therefore, you’ll want to choose and measure carefully before installing them.

Read next: 27 RV Backsplash Ideas for your Camper’s Kitchen and Bathroom.
Countertops
Common issues: Scratches, stains, delamination.
Repair or replace? Minor scratches and stains can be repaired with surface refinishing kits. Laminate edges can be re-glued. If there is significant damage or you want a fresh look, countertops can be replaced with more durable materials like solid surfaces, quartz, or updated laminate. This can be a more involved project, but the impact of brand-new countertops is well worth it.
Design tips: You’ll want to choose countertops that enhance the style of the rest of your kitchen. If your style is contemporary, consider a white or cream-colored counter. If you’re going for a more rustic modern vibe, butcher block might complement the rest of your look. Interior design experts suggest that the lighter the countertops are, the larger the room will feel.
Read next: 16 Ways to Makeover Your RV Countertops.

Cabinets
Common issues: Worn finishes, loose hinges, water damage.
Repair or replace? Repainting or restaining cabinets can refresh their appearance. Tighten or replace hinges and handles for easier use. If cabinets are structurally unsound or noticeably outdated, replacing them with new units or custom-built cabinets can offer better storage solutions and a modern look. This can be a moderately complex project, depending on customization.
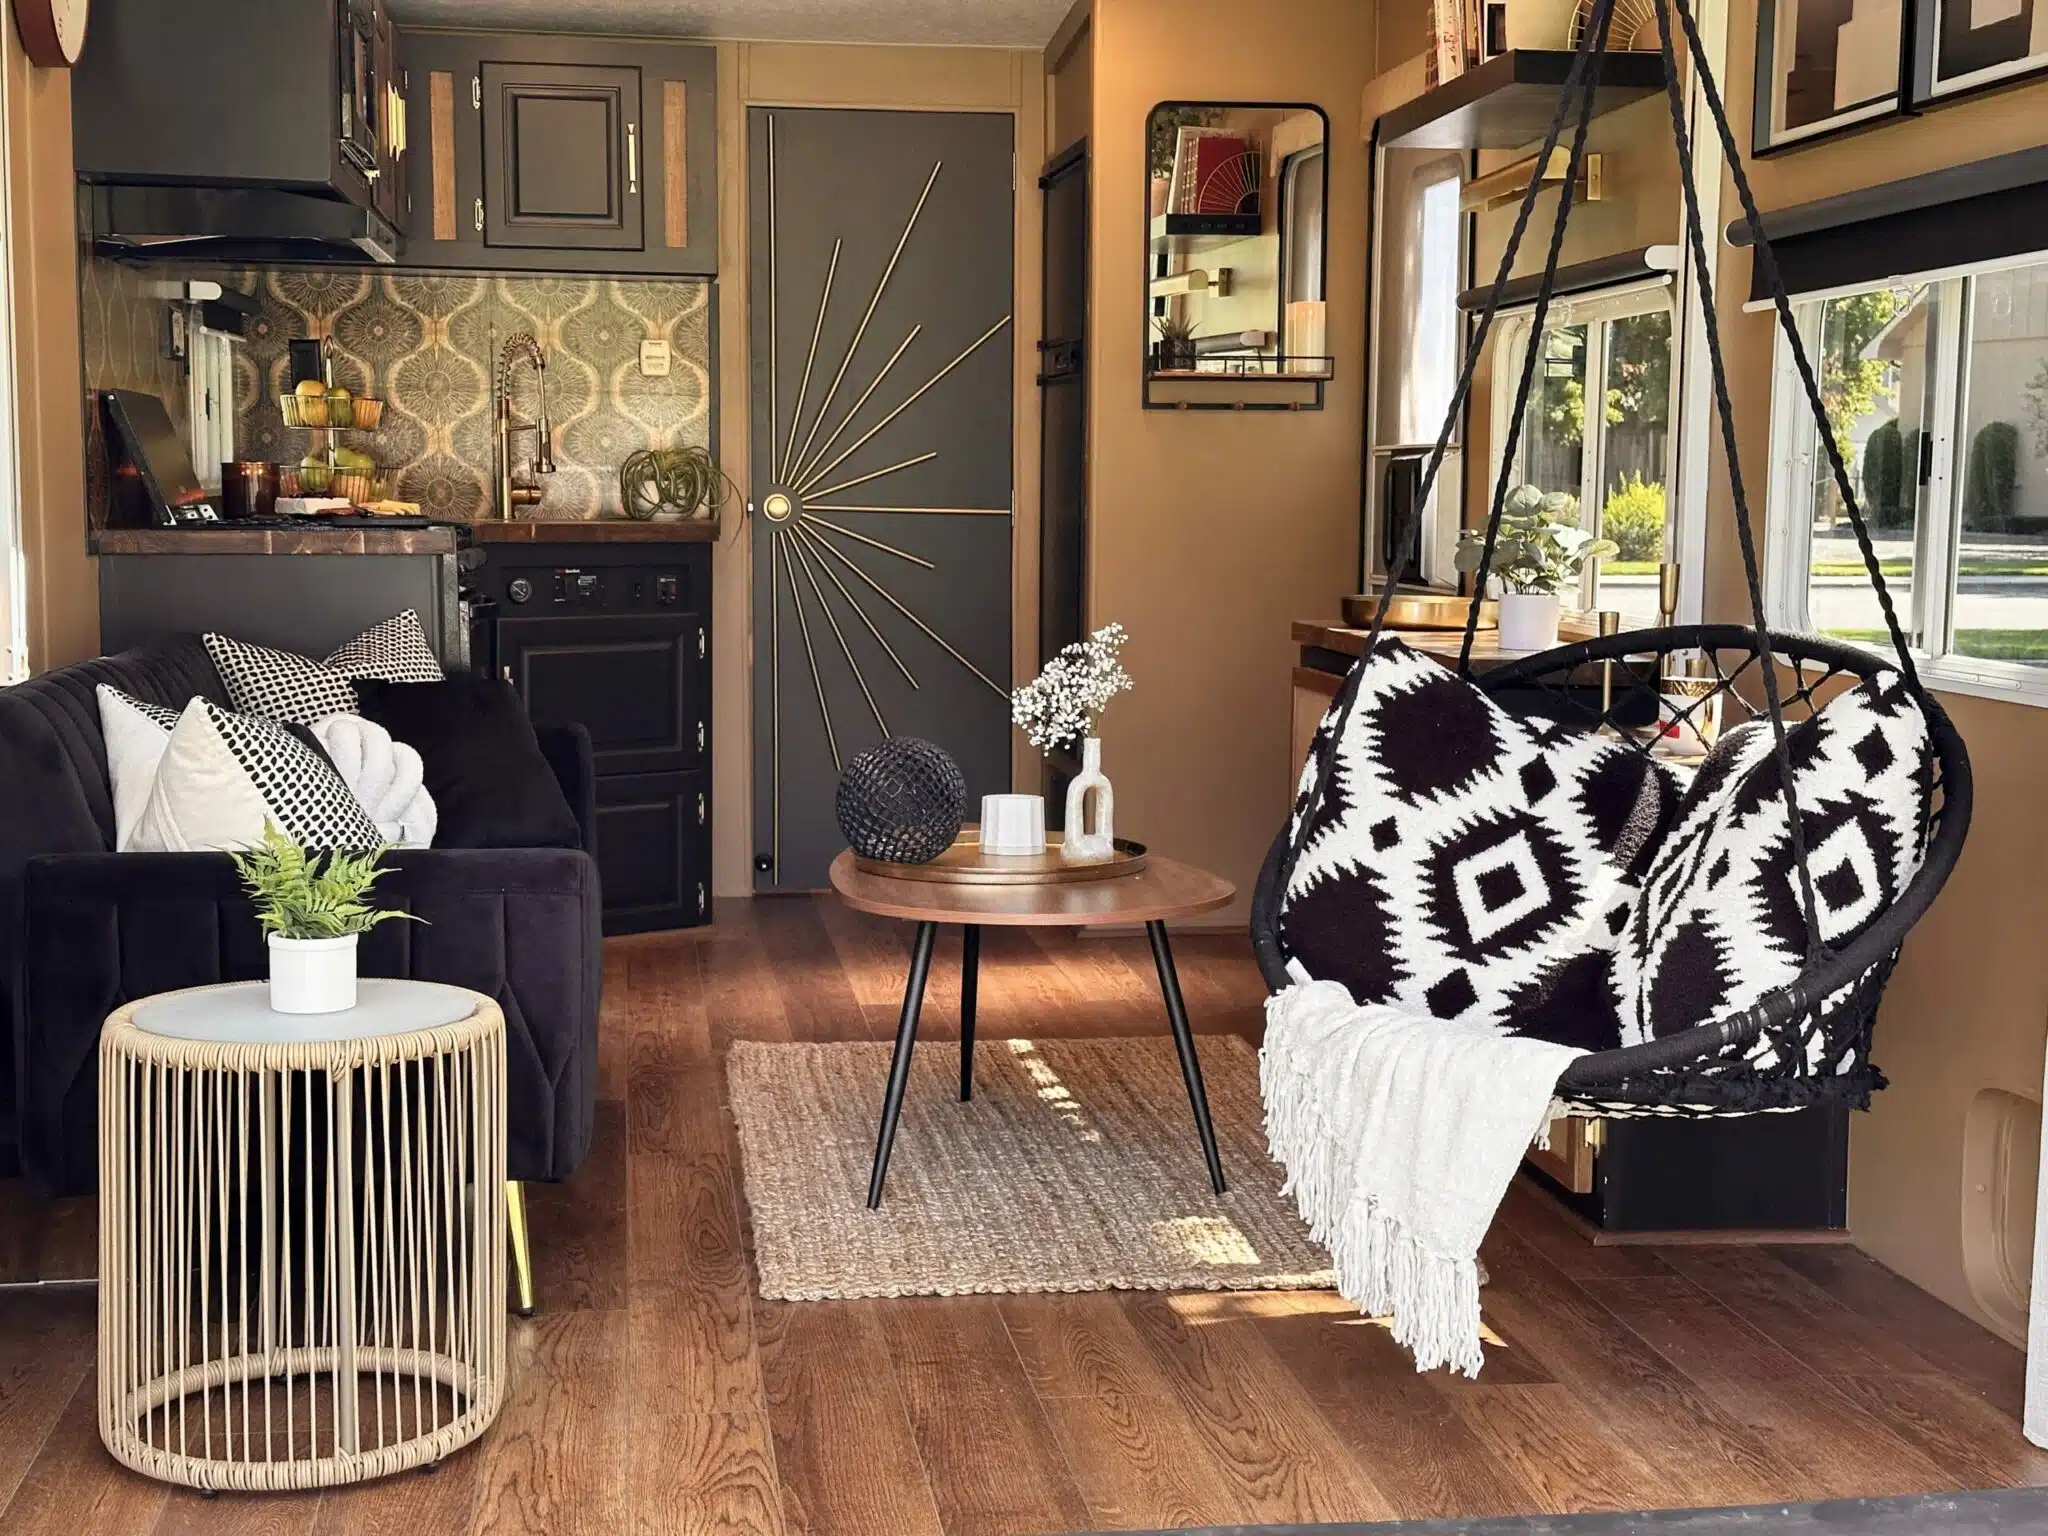
Design tips: If your cabinets are outdated but functional, we recommend painting them to give them a fresh look. Be sure to sand, prime, and remove cabinet doors before painting. When deciding what color to paint your cabinets, you’ve got some options. You can opt for light-colored cabinets to open up the space or use a darker color for a bold effect similar to an accent wall.

Notice how the teal really pops in his predominantly light space.
Read next: 11 Clever Ideas for Organizing RV Cabinets.
Lighting
Common issues: Burnt-out bulbs, wiring problems.
Repair or replace? Replacing bulbs or rewiring fixtures is generally straightforward and inexpensive. Upgrading to LED bulbs can improve energy efficiency. Replacing fixtures can modernize the RV and enhance the lighting quality if the fixtures are outdated or severely damaged. Installing new fixtures is usually doable as a DIY project.
Design tips: Consider natural lighting from windows when planning for lights, but make sure there’s still enough light for when it gets dark outside. Matching light fixtures to the rest of your interior can reinforce the theme or style you’re trying to achieve.
Read next: 24 Easy RV Interior Lighting Updates.

Interior designers recommend having multiple light sources in each area and matching light fixtures to help with cohesiveness throughout your RV.
When deciding on any major changes, make sure everything will look cohesive in the end. For example, if you’re doing a total makeover of the walls and cabinets to make them look pristine and modern, consider replacing the old carpet to match the new look.
Decide what you’ll tackle yourself and what’s best left to the pros. This will depend on your expertise and experience, your budget, and how ambitious you’re feeling!
If you’re eager to take on a project yourself but would like a little guidance, consider reaching out to one of these RV renovators for support.
For more, check out our RV remodel process guide and our overview of RV renovation costs.
Choose Materials and Colors
Now that you’ve ironed out the big decisions, it’s time to hone in on the finer details.
This is the part of the process where your ideas really start to take shape (and color). Start deciding what specific elements you will add to your RV. You should go back to any pictures or videos you found as inspiration.
Two significant projects RV owners often tackle are redoing the floors and walls. Here are some commonly used materials for these projects and their pros, cons, and rooms they’re most suited to.
Common Materials for Flooring
Vinyl plank flooring is waterproof, durable, and easy to install. Plus, it comes in a variety of styles to match your decor. However, it can be prone to scratches if not properly maintained. Vinyl plank tends to be on the pricier side, but if you can spare the cash, it is an excellent choice. This type of flooring is best suited for high-traffic areas, kitchens, and bathrooms.

This Fleetwood Discovery for sale features new vinyl flooring.
Laminate flooring is easy to install and available in many different styles and colors. It’s usually less expensive than vinyl flooring. However, it’s not as water-resistant as vinyl, making it more suitable for living areas and bedrooms.
Carpet is a popular choice for many RVers because it’s affordable, comfortable, and adds warmth. It also offers good insulation and sound absorption. The downside is that it’s harder to clean and not very moisture-resistant. Carpet works well in bedrooms and lounging areas where it’s less likely to get wet.
Rugs can be a great alternative if you love carpet style and sound absorption but are not sold on installing carpet throughout your RV. Rugs are a flexible way to add warmth and insulation to any room. They’re available in many sizes, fabrics, and styles and are easier to clean than carpet if dirty or wet.
Read next: What Kind of Flooring is Used by Most RV Owners?
Common Materials for Walls
Wallpaper is a great option for RV walls because it’s durable, easy to clean, and moisture-resistant. This makes it perfect for high-moisture areas like bathrooms and kitchens. It can be challenging to remove or replace, but you have the option of painting over wallpaper when it’s time for a change!

Paint is also easy to apply and update and comes in endless colors. It’s suited for any interior wall, especially if you like changing up your color scheme often. It can also be applied to other RV features, like cabinets or furniture, if you want to take your color scheme beyond the walls! Paint can chip and peel without proper application or upkeep, so be sure to read the label and follow best practices (like sanding and priming!) when painting.
Wall panels like beadboard or shiplap are great if you want to add texture and dimension. These options are durable and can be painted or stained to match your style. They’re perfect for creating accent walls and adding to the theme of your RV. Installing wall panels is a bit more labor-intensive, but the result will be worth the effort if done right.
Wall panels, like this bead board from Nick Karr, can go a long way in making a space feel less empty without overwhelming the space.
Read next: How to Build a Board and Batten Accent Wall: Ideas for a Stylish RV Remodel.
Choosing Colors
Light colors make small spaces feel larger and more open, while dark colors add coziness but make spaces feel smaller. A neutral or light color palette in compact spaces like RVs helps create a sense of openness. Accents in bold or dark colors add contrast without overwhelming the space. Consider the natural and artificial lighting in your RV and how that will affect the way your color palette appears.
Ensure the color scheme flows throughout your RV. Coordinate wall, furniture, and accessory colors for a cohesive look.

A neutral color scheme allows you to redecorate quickly and as often as you want, like how this bedroom is made festive with a few simple Christmas decorations.
Implementing Colors
Accent Walls: Use a bold or contrasting color on one wall to create a focal point and add depth.

Accent walls are a great way to add depth and interest to a room.
Accessories: Incorporate color with throw pillows, curtains, rugs, and artwork. These are easy to change for a fresh look.
Textures: Mix textures to add visual interest. For example, pair smooth surfaces (like laminate countertops) with textured fabrics (like linen or tweed).

Choose Furniture
When choosing furniture for your RV, look for lightweight, compact, yet comfortable pieces.
Here are our top considerations for choosing the right furniture for your RV.
Size and Space Optimization: Make sure all furniture fits comfortably without obstructing movement or cramping the space. Look for furniture that serves multiple purposes, like a bed with storage drawers or a dining table that converts into a workspace. Consider foldable or collapsible tables and chairs that can be stored away to maximize space when not in use.
Weight: Choose furniture made from lightweight materials like aluminum frames or composite wood to avoid exceeding your RV’s weight limits. Distribute the weight of the furniture evenly to maintain the balance and stability of the RV.
Comfort: Choose chairs and beds designed for efficiency and comfort. Take a look at how Matt Knight from Adventurous Way redesigned his interior to create an ergonomic workspace.
Price: Balance quality with cost by considering both new and gently used furniture. Look for sales and discounts, but invest in key pieces like a good mattress and a sturdy table. These will go a long way in maximizing your comfort and your RV’s longevity.
Ease of Installation: Choose furniture that’s easy to assemble or install yourself. Flat-pack furniture can be a good choice for this. For those less inclined to DIY, consider pre-assembled furniture that can be easily secured in place.
Read Next: RV Furniture Upgrades: Finding What Will Work Best for Your Rig.
Decor
If you’ve made it this far in your RV redesign, congratulations! You’ve made it to the fun part: deciding how to decorate it. You can revisit any inspiration pieces you’ve found throughout the design process. Remember, it’s all about what makes you feel comfortable and at home (even if it doesn’t look exactly like the luxury RVs you see online).
How you choose to decorate will depend on your preferences, but here are some universal tips you can follow to make the most of your RV’s interior.
Incorporate functional accessories. Look for items that pull double duty as both decoration and useful tools. Think baskets for storage or decorative bowls that can hold keys or other essentials.

Notice the use of jars and baskets as decorations and functional containers.
Secure breakable accessories. At the risk of stating the obvious, your RV will be moving. With this in mind, it’s important to secure any breakable items. Museum putty can be a lifesaver for keeping things in place while on the road.
Minimize clutter. This is a good rule of thumb when designing any interior, but it’s extra important in a small space like an RV. Ensure that every item that enters your RV has a “home” where it lives when not in use. This will keep your space tidy and open.
Add personal touches. Make your RV feel like home by adding personal touches. A photography wall or souvenirs from various trips can help you create a cozy and familiar atmosphere.
Incorporate greenery. Artificial or real houseplants can add life and color to your RV. This list from RV Life describes six plants that thrive in RVs.

There are many ways to enhance your RV’s interior and make the space feel bigger, so choose some you like and get creative!
Conclusion: A Guide for Designing Your RV
After learning more about the steps involved when designing your RV and tips to make it simple, you should feel prepared to tackle designing your RV!
Have fun designing your vision and bringing your RV style to life!


Haley is a virtual school psychologist and copywriter for travel and personal finance businesses. She is planning and saving for her own RV life and in the meantime, enjoys exploring new campsites with her Silverado named Trucky and a truck bed tent. Haley is a big fan of tennis, animals, Texas, and making people laugh.


