My Favorite RV Hack: Acrylic Mounting Tape
This post may contain affiliate links.
A No-Damage Adhesive for Hanging Things on Walls and Securing Items During Travel
I talk about my favorite DIY helper, acrylic mounting tape, so often that I thought I would do a whole blog post about all the different ways I’ve used it in my RV. With acrylic mounting tape, I can hang things on my RV walls with no damage and with no holes in the walls. Plus, it keeps things in place while the RV is moving, and can stick things just about anywhere I want to put them.

What is Acrylic Mounting Tape?
Acrylic mounting tape is a clear, double-sided tape that is extremely sturdy yet can be removed easily. It won’t damage walls or whatever surface it was attached to or leave behind any residue.
- XFasten Extreme Heavy Duty Mounting Tape is waterproof and can hold up to 5 lbs of mass per square inch of tape.
You might be thinking some brand paid me to write this post, but nope! In fact, I’ve tried a few different brands of it, which I’ll share more about at the end of the post.

It’s thicker than normal tape, and it’s a stretchy/rubbery/gummy material, kind of like the stuff used to stick a new credit card to a piece of paper for mailing. Its texture gives it some flexibility and helps it grab onto a surface.
I’ve used it many different ways with great success.
Hanging Things on RV Walls
First, here’s a photo I hung on the wall with it. This is a lightweight 5″x7″ frame.

In this video, you can watch me take this picture down a year or two after I put it up:
Securing Items During Travel
One extremely useful use for acrylic mounting tape is for securing items while an RV is in motion, to keep things from rattling, or from falling and breaking.
Sticking Decorative Items to a Shelf
This was a good idea that almost wasn’t a good idea.

I used a tension pole shower caddy to add extra decorative space in the corner of one of my slides.
The problem was, as soon as I set a plant on the top shelf, the weight pulled down on the spring (duh, Ashley) and caused the caddy to fall over.
My solution—along with only setting lightweight things on the top shelf—was a piece of acrylic tape to hold the end of the pole in place. So far it hasn’t budged!

Securing Items Hanging on an RV Wall
Here is a ceramic planter I hung on a curved wall (with a screw).

If you look like closely, you’ll see a tiny piece of clear tape at the bottom to keep it from rattling off the wall every time my washing machine hit the spin cycle.
It hasn’t budged since!
Let’s just ignore the fact that this planter doesn’t have any plants in it. ?
Securing Over-Cabinet Organizers
At one point this over-cabinet basket slipped off the cabinet door while our RV was bumping down the road. I stuck some acrylic mounting tape to the underside of the pads so they would stick to the cabinet door.

It has stayed in place ever since, and the tape also keeps the metal from scratching the cabinet door where the foam pad doesn’t provide enough cushioning.
Making “Walls” for My Shower Shelves
This next one is one of my favorite RV projects just because I spent such a long time trying to find a solution (unsuccessfully) before finally coming up with an idea that I love.
If you have an RV shower with built-in corner shelves, you probably know that anything left on the shelves while the RV is moving will fall off.
I wanted to find a way to keep this from happening that would allow my shelves to be used and wouldn’t require the shampoo to be moved every time we drove. So I made plexiglass “walls” for my shower shelves.

These plexiglass panels are stuck firmly to my shower walls (even when wet!) with acrylic mounting tape.
Full tutorial: DIY: How to Add (Removable) Walls to Shower Shelves
Making Storm Windows for My RV
Another really successful project was making permanent plexiglass storm windows to cover the parts of my RV windows that don’t open. I used acrylic tape around the edges and stuck the plexiglass to that.
It’s really hard (for me at least!) to take a picture of a clear glass window, but you can sort of see the plant’s reflection on the plexiglass in this photo:

For more, read: 6 Ways to Insulate Your RV Windows (That Don’t Block the Light!)
Here’s another window project that’s kind of silly, but illustrates the ability of the tape to hold in any weather.

We let our cat go outside by climbing out this window and down this board, and I wanted to cover the window with plastic for winter, but needed to still be able to open it and have a hole for my cat to climb out. I attached clear vinyl to the outside of the window using the tape.
I know the hole partly defeats the purpose of the window insulation, but at least it blocks some wind while the window is open and my cat is making up his mind about whether or not he wants to go out (after scratching at the window for the past five minutes).
Here’s a closer look.

I actually had my doubts about how well it would hold because it was below freezing the day I put it up and I had to warm the tape under my hands to get it to stick. But after it did stick, it stayed firmly stuck until spring when I removed it—even through sub-zero temperatures, rain, ice, and snow.
Making a Non-Permanent Cover for a Wall Sconce
For this wall lamp, I had actually planned to use Velcro to make removable covers, but the Velcro looked so bad, I ended up using acrylic tape instead. And it worked just how I wanted it to!

I was able to remove the geometric patterned cover and replace it with the red and white one for Christmas, and the tape was still sticky enough to hold it on.
Adding No-Drill Shelves to RV Cabinets
For this project, I used acrylic tape to stick wood supports to the end of this cabinet to add a shelf and utilize the space at the top that had been wasted before. I have no doubts that the shelf will easily hold anything I want to set on it.

Brands of Acrylic Mounting Tape I’ve Tried
So now that you can see why I love this stuff, let me tell you about some of the different brands I’ve tried.
Gorilla Tape
- Crystal Clear: This permanently clear double sided tape won't yellow over time; making it the perfect window hanging adhesive to match your clear windows
I bought this brand at Lowe’s one day when I needed some right away. It works great, but cost-wise it isn’t the best value compared to these next two brands.
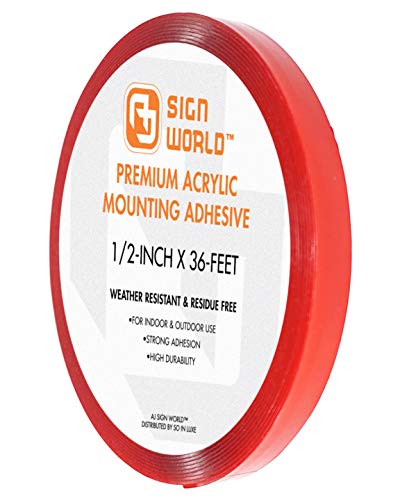
AJ Sign World
- PRESSURE SENSITIVE - Press firmly for 15-20 seconds to activate bond, holds up to 5 lbs per square inch of tape.
This one comes in both a 1/2″ width and a 2″ width. The first roll I got was 1″ wide, and I found myself cutting it in half lengthwise a lot, so for me buying the 1/2″ width was a time saver. (I told you I use a LOT of this tape, lol!)
XFasten
- XFasten Extreme Heavy Duty Mounting Tape is waterproof and can hold up to 5 lbs of mass per square inch of tape.
Finally is XFasten, which is the best deal for the money that I’ve found so far. And if you look at the reviews for it on Amazon you can see photos where people tested it by using it to stick things like cast iron skillets and ceramic mugs and cans of stew to the wall!
Okay, I’m almost done preaching!
The last thing I will say is that even though I can’t promise this tape will work for every situation, I do believe that even if you buy it for some reason and it ends up not working in that particular case, you will still be able to find plenty of other practical uses for it. At least, that’s what happened to me! 🙂
Video of Me Demonstrating Acrylic Mounting Tape
If “a picture is worth a thousand words,” then a video is worth a thousand pictures!
Here’s a video where I demonstrate what the acrylic tape actually looks like and feels like, and some of the ways I’ve used it in my RV:
Reader-Submitted Ideas for Acrylic Mounting Tape
One of my subscribers told me that after reading this article she has been finding uses for acrylic mounting tape all over her RV! She shared these photos with me of how she upcycled small bottles and used the tape to attach them to her bathroom cabinet doors for storing small items.


Ashley Mann founded RVinspiration.com in 2017. She handed off the website to new owners in 2022 to launch a new business as an online entrepreneur coach, but she still helps out as the blog editor. Ashley spent three years living full time in a 38-foot, 5th-wheel RV with her husband Josiah and their cat, Kitty. Her favorite thing about RV life is the challenge of finding the perfect way to organize a space, and she loves seeing all the creative and clever ways people come up with to customize their RVs.






Good information to know! Thanks for the tips… we’re not full-time yet, but someday!
Love your ideas, but my husband says acrylic tapes will not stick while storing trailers through cold winter months and heat is not in use. True??
One way to find out for sure – try it! 🙂 But, as I mentioned in the article, I found that the acrylic tape I used on the outside of my RV has stayed firmly stuck through negative temperatures, rain, and snow. I think it helps to warm it a little you’re sticking it to begin with. I also find that it does best when joining two flat surfaces.
Glad I found this site!
Aww, glad you’re enjoying it!
What about if you need to remove it? How do you remove it?
The tape is actually pretty easy to peel off the wall (or whatever it’s stuck to!) and doesn’t leave any damage behind! Kind of like peeling the sticky stuff off the back of a credit card. For larger items (such as a picture stuck to a wall), it helps to slide a butter knife behind the item to loosen the tape a bit, and then kind of twist and tug, and then usually the item comes free all of a sudden, and then you can peel off any tape that may have been left behind. Hope that helps!
Did you use any prep like alcohol before mounting it?
Any time I use acrylic tape, I make sure the surface I’m sticking it to is clean (free of dust and dirt) and dry, but most surfaces require no special cleaning. I have never used alcohol prior to using the tape. The only times I’ve ever had the tape fail it was due to the weight of the object which caused the tape to stretch before the item finally fell, in which cases I usually just apply more tape and then it’s fine. 🙂
Ashley,
I like your posts. I tuned in to see your method of window insulation. You have proven that I need to get some of this tape.
I thought your idea to hang pot lids overhead was definitely the “acid test”. Since they hung for a week shows the tape works incredibly well. I have 3 ideas if you care to try again.
1. Reattach as before and then add screws in the provided holes. The plywood is very thin so you just tighten the screw until you feel the least amount of resistance. I watch until the “whatever” is getting close to contact and start to focus on “do I feel it getting the least bit tight”, and then stop. This will work. You can get colored screw heads – brown, white black or paint them yourself.
2. Use 2 part epoxy. This is a permanent solution. You will never get the hooks off without destroying the plywood.
3. Cut a piece of plywood that fits the cabinet. Attached hooks permanently to it. Then put the plywood into the cabinet. You could support it similar to how you put the mini shelf in, in this post.
Keep on blogging the great ideas.
Thank you so much for the wonderful feedback! I have been meaning to try again using screws, but I really like your plywood idea, and in fact, that has me thinking, maybe pegboard would work even better! Then I could remove it and reconfigure the hooks as needed without having to drill a bunch of new holes!