
Updating RV Slideout Trim: Tips & Ideas from 10 RVs
This post may contain affiliate links.
If you’ve ever stood back and admired your freshly painted RV wall only to notice that the RV slideout trim suddenly looks dark, dated, or totally out of place — you’re not alone.
Slideout trim is the finished wood (or faux-wood) border framing your slide-out space. It’s a small detail, but it has a big visual impact. In many factory RVs, the trim is stained a dark tone that can feel heavy once you lighten the rest of the interior. The good news? Updating it often creates a high-impact change, but it is still a relatively simple upgrade.
In this article, we’re sharing 10 real RVs with updated slideout trim! With a mix of fully replaced trim and simple painted updates, plus practical tips to help you decide what’s cosmetic and what’s structural before you start.
Why RV Slideout Trim Often Stands Out (in a Bad Way)
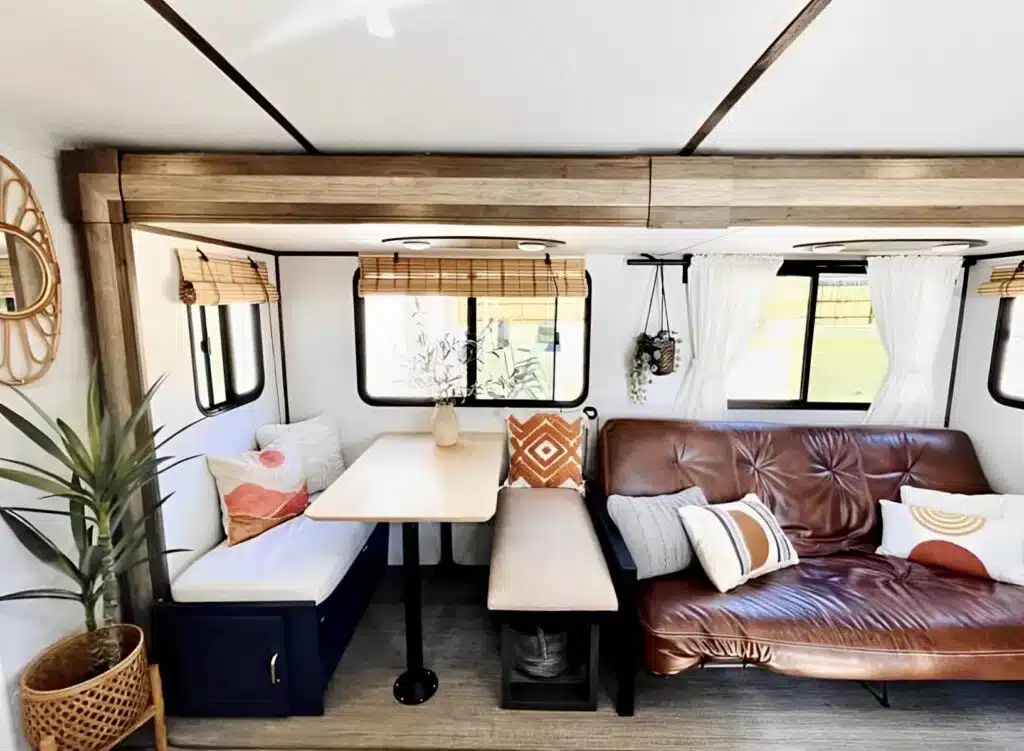
Factory slide trim is usually made from wrapped MDF, stained hardwood (on more luxury manufacturers) or vinyl-wrapped composite boards.
It’s typically installed in a dark, glossy finish meant to match the original cabinetry. But once you start an RV interior update — like painting cabinets or adding new wall treatments, that dark trim can quickly feel out of place. It’s a simple solution, though, because just by updating the trim, you can help the slide blend seamlessly into your overall style!
Real-Life Inspiration: Updated Slideout Trim in RVs
Below are 10 RVs that showcase a range of slideout trim ideas—from bright white paint to rustic wood replacements.
1. Rustic Flat-board Trim

These RVers removed their trim around the slideout space that houses their home office. The flat wood boards look modern and clean while adding warmth with their natural stain. You can still see the wood grain, which is finished in a matte sheen, which makes the space feel rustic.
Feeling inspired to makeover your RV? We have a whole guide here!
2. Classic and Clean White Painted Trim

In this RV, they kept the decorative trim in the dining space slideout, but they painted it! Using a glossy and bright white paint not only on the trim but all the way into the slideout (walls and all) makes the trim no longer stick out like a sore thumb. The result? It looks classic in style, and seamlessly blends.
3. Sand and Restain

If you have solid wood trim, you can remove the heavy varnish, sand down the stain and restain to the tone you want. These RVers went with a two-tone wood grain stain which is very trendy and hip—matching their neutral cool decor. Of course, this wouldn’t work on MDF or composite board trim.
4. Unstained Natural Wood

For a totally natural look—and possibly for the simplest replacement version—you can use a natural wood board. This RV features a minimalistic interior, which can sometimes feel too stark if you don’t add in warmth. The use of natural wood—especially as the trim lining the large slideout brings it all together! One advantage of using flat wood boards like these is that they come in varying lengths and are quite easy to make seamless as trim.
5. Blending Trim with Paint

We love a clever RV interior upgrade! Besides the gorgeous accent wall, there was a major RV slideout trim update here! To update the trim of the slideout in this RV, the owners removed the vertical side trim and painted it to blend with the wall color all around. They then replaced the top trim piece with a modern white board and painted that to blend with the ceiling. The effect? The slideout blends seamlessly with the whole room, and doesn’t feel “boxed out” with trim. It’s a clever design hack to create a bigger-looking space!
6. Bigger and Bolder

The slideout in this fifth wheel was already massive—so why not go big with the trim? The top trim has been covered with narrow wood panels, which gives the effect of a thick wooden beam.
Want to see more incredible RV makeovers? We’ve got a fun roundup here!
7. Tile Is the New Trim

Who said you have to replace your trim with more wood? In this RV slideout with a stylish blue and white glam style, the RV owner replaced the trim with beautiful Art Deco-style tiles. Tiles like these are typically inexpensive, easy to install, and make a huge impact! This blocks out the slideout like it’s its own room entirely, which can be great if you want a visual division of space.
8. Wall Color Paint on Trim

This RV makeover is the perfect example of how to blend original finishes and cabinetry with modern updates. The trim of the slideout is original to the RV and would most likely look dated if left as-is, however these RV owners made a clever design decision. They left the oaky finish, which compliments the cabinetry and leather sofa, but painted the center of the trim a dark green—the same as the wall color. Because it’s a matte sheen, and blends with the walls, it makes the trim stand out less, and look more intentional. We love how simple this design choice is!
There are a lot of tips and tricks to paint RV trim and cabinetry, but we’ve got all of them in one place!
9. Black Trim

This RV is a boho paradise on wheels! With lots of neutral accents, natural materials and of course—updated slideout trim. The owners kept the original trim piece, which would lean very traditional in style if they’d kept the dark cherry wood stain. They decided to paint it in a bold black matte paint which not only updates the whole look but actually acts as an accent to the slideout.
10. Framed Fireplace Slideout

This fifth wheel got a serious glow-up! In the living room, there is a slideout that features a fireplace with a space for a TV, and it’s all framed in beautifully with decorative trim! The horizontal top piece is a large but thin piece of natural wood that has a light stain and clear top coat, so the beauty of the natural wood can shine through. On the sides, there are grooved panels, which almost look like elegant columns. Together this brings a modern farmhouse vibe that complements the rest of the RV. See the whole space here!
Painting RV Slideout Trim: What to Know Before You Start
If you’re thinking about painting RV slide trim, the good news is that it’s not some mysterious, totally different project. It’s basically the same process as painting cabinets or any other finished wood inside your RV.
In fact, you’ll want to follow the same prep and finishing approach outlined in Painting RV Cabinets: How to Get Good Results. The prep work really is what makes or breaks the outcome!
However, what your trim is made of is very important to understand before deciding on any project.
If your RV slideout trim is real wood, you’ll want to start by sanding it thoroughly. You don’t have to strip it to bare wood, but you do need to remove the glossy finish so your primer can grab onto it. After sanding, apply a high-quality bonding primer . Don’t skip this step—it’s what keeps your paint from chipping later. Once primed, finish with a durable enamel or cabinet-grade paint that can handle everyday wear and tear.
If your trim is wrapped, laminated, or manufactured wood, the process is slightly different. These slick surfaces don’t accept paint easily, so cleaning is critical. Degrease it really well first. Then lightly scuff sand if the surface allows it. After that, use a bonding primer specifically designed for glossy or manufactured surfaces. That’s what helps your paint stick long term.
For many RV owners, painted slideout trim ends up being the easiest and most budget-friendly option. If you like the shape of your trim but just hate the color, painting can completely transform it without the extra work of tearing anything out.
Replacing RV Slideout Trim: Design Options & Important Cautions
If you’re not a fan of the existing trim profile—or it’s chipped, warped, or just feels dated—then replacing RV slideout trim might be worth the extra effort.
There are several popular design directions RVers are taking right now. Many choose flat white boards for a clean, modern look. These simple square edges feel fresh and intentional, especially in contemporary remodels. Others prefer stained wood trim to add warmth and contrast, particularly in farmhouse or rustic-style interiors. And some simply swap ornate factory trim for a more streamlined profile that better matches updated cabinetry.
If you’re working on floors at the same time, it’s also smart to think about how everything ties together. Before installing new trim, take a look at How to Handle the Slide-Out Transition When Flooring an RV so you can plan ahead and avoid rework later.
Critical RV-Specific Note
Before you go ripping out your trim, it’s important to know that decorative RV slideout trim is covering metal trim and screws that actually help secure the slide mechanism. That means if your slide ever needs to be repaired, adjusted, or removed, that decorative trim has to come off (and it needs to come off without being destroyed.)
So when replacing trim, avoid permanent adhesives. Try not to rely solely on brad nails either, since they can make removal difficult and damaging. A better option is to attach your trim with Torx screws instead of nails or Phillips screws. Torx heads are far less likely to strip, which makes future removal much easier.
It’s worth repeating: the decorative trim is not structural, but it does need to stay removable in case you ever need access to what’s behind it.
Choosing the Right Update for Your RV
So how do you decide whether to paint or replace?
Painting makes sense if you already like the trim’s shape and you’re planning to paint cabinets anyway. It’s usually faster, less expensive, and far less disruptive. If your goal is simply to brighten or modernize the space, paint often gets the job done!
Replacement makes more sense if the trim profile feels outdated, damaged, or completely mismatched to your new design direction. If you’re going for a dramatic style shift, like rustic wood accents or ultra-modern flat boards, replacing might be the better long-term solution.
As you decide, think about how your slide trim relates to the rest of your interior. Try to coordinate it with cabinet color, window trim, accent walls, or other wood tones. And if you have more than one slideout, keep your updates consistent throughout the RV. That consistency is what makes the whole space feel cohesive instead of pieced together.
Final Thoughts on Updating RV Slideout Trim
It’s kind of wild how much RV slideout trim can affect the overall feel of your interior. You might not notice it at first—but once everything else gets updated, it suddenly becomes the one thing that feels “off.”
The good news is that this is usually a manageable project with a surprisingly big payoff. Whether you choose paint or replacement, updating your trim can make your slideouts feel intentional instead of leftover from the factory.
If you’re unsure, start with one slideout as a test run because you can always expand the project once you see how much it changes the space. And if you’re looking for more ideas, RV Inspiration has plenty of interior makeovers and renovation stories to help you plan your next update!

Katherine Bitner spent a year full-time RVing with her husband and dog around the US. As a former interior designer, her favorite thing was budget-friendly ways to make her home on wheels feel luxurious and Pinterest-worthy! She is now a full-time writer and author.


Need Rv trim makeovers