How a Corner RV Bunk Room Was Converted to a Mobile Office
This post may contain affiliate links.
Many RV owners work from their camper or motorhome, making a mobile office space an essential.
Full-time RVer Susie Crabtree works as a remote bookkeeper and needed a designated office space in her 2017 Sportsmen travel trailer.
With the help of her son, she removed the RV bunk beds that were located in the back corner of her camper and converted the space into a wonderful mobile office.
She generously shared the process to inspire other RV owners to make their own mobile office.
The Project Begins
This is what the bunkhouse area looked like before the conversion. Just a typical corner RV bunk with full-sized beds and a weird notch cut out of the mattress.

Removing the Bunks
Demolition is in progress!
The bunks were secured to the walls with long staples and weren’t too difficult to remove with pliers. For removing most furniture in RVs, all you’ll need is a screwdriver and pliers.

An Unexpected Surprise
Susie and her husband purchased this particular model of travel trailer planning to remove the bunkbeds and convert the space into an office.
They knew they would have to account for the water heater and electrical box, but they did not anticipate finding a pipe in the way of their plan.

Solving the Problem
First, a box was built using materials left over from the bunk removal to cover the hot water heater and electrical wiring. Both boxes can be easily disassembled if repairs are needed.

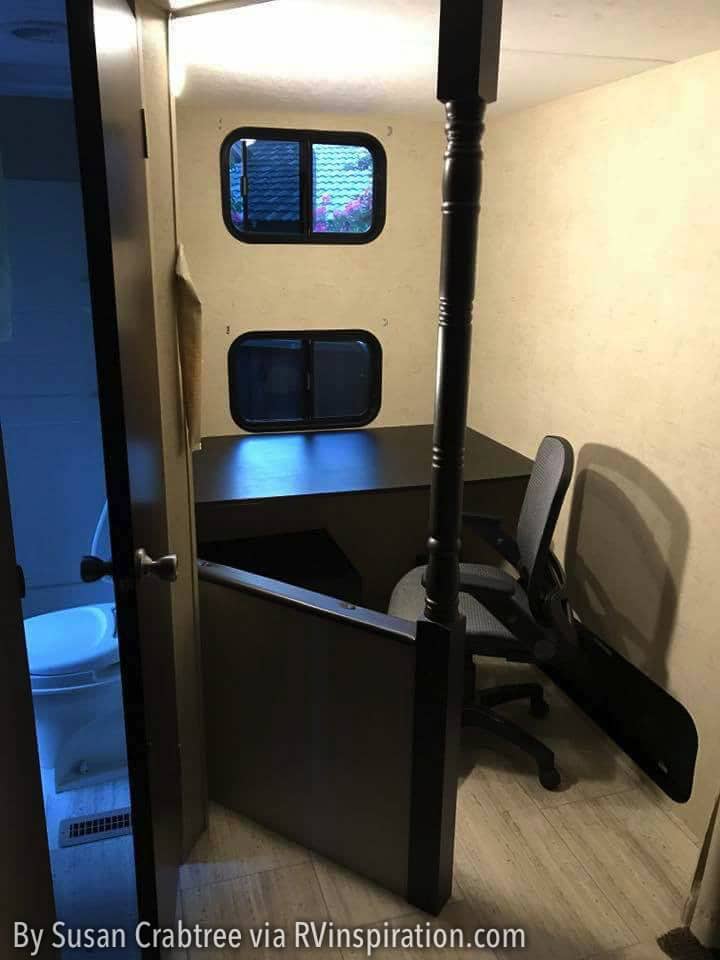
Next, in order to avoid having to reroute the plumbing, a pony wall was built to enclose the pipe using more salvaged materials (including leftover wallpaper strips to cover the seams), along with an added post.

It’s All in the Details
Some cushioning was added to the top of the wall using a faux leather piece which was salvaged from the bunk demolition. This helps the project look like it was original to the RV instead of looking like a DIY project.

The wooden post, painted to match the rest of the wood in the RV, was attached to the ceiling using a disk cut from a piece of salvaged plastic. This was screwed to the top of the post and to the ceiling.

Susie says this post is the sturdiest thing in the whole RV.

Installing a Built-in Desk
The desk was handmade from a sheet of plywood cut to fit the space, finished with paint and varnish, and mounted with metal braces on three sides.

Here’s a view of how it was mounted, including a hole cut for electrical cords:

Powering the Electronics
Since there were no electrical outlets in the bunk area, Susie uses extension cords to power her computer.
Following the advice of her “I.T. guy”, she uses an industrial-grade power strip mounted under the desk.

She then ran a flat extension cord along the wall, which she plans to hold in place using Command hooks or cord clips.
Since the cord runs under the carpet of the slide on its way to the wall outlet, it has to be unplugged whenever the slides are brought in.

Here is where the extension cord plugs into the outlet.

Susie uses a Progressive Industries RV surge protector to protect her electronics in the event of a power surge. I highly recommend this for every RVer.
I purchased the same type of surge protector for my own RV. A low voltage situation killed our Nespresso machine and caused us to have to replace the motherboard of our washer/dryer.
The Completed Project
Here is Susie’s office after 11 months of almost daily use.

The larger monitor is mounted to the desk with a heavy-duty articulating mount. It can, as Susie says, “withstand the mini-tsunami that occurs inside a towable on moving days.” The laptop connects firmly to a docking station which is attached to the desk using heavy-duty Velcro.
The constant traveling killed Susie’s printer. She replaced it with a lightweight one that is fastened to the desk with Velcro as well.
Below is a photo of the office area after the construction was completed.

Ashley Mann spent three years living full time in a 38-foot, 5th-wheel RV with her husband Josiah and their cat, Kitty. Her favorite thing about RV life is the challenge of finding the perfect way to organize a space, and she loves seeing all the creative and clever ways people come up with to customize their RVs.




Awesome transformation. My only concern is maybe an additional maybe tension rod or 2 under the desk top to help support the desk top with the weight of the equipment on top of it, unless you used a sturdy board for the desktop so that it doesn’t warp over time. Otherwise, I think it’s awesome. Congratulations!
Well this person has been using the desk for over a year now with no problems yet, so I think the type of wood and brackets they used are pretty sturdy!
However adding some type of legs as extra support isn’t a bad idea!
Hi Susie – Your office space looks great! I found this article by clicking through on a Pinterest link. I am wondering what size screws you used to secure the bracket that supports the desk top to the wall. I want to install some bookshelves. Then rereading your article, it says that you do remote bookkeeping, which is what I do as well. 🙂 I look forward to hearing from you. Thank you!
Hi, actually I wrote this article about Susie and her RV, so unfortunately I don’t know the sizes of the screws. However, you might try contacting her through Facebook – her name on Facebook is Susie Wilson Crabtree. If you are in the Facebook group RV Interior Ideas, you could try commenting on this post about her remodeling project and tagging her if a direct message doesn’t work. Let me know if you aren’t able to get in touch and I will see what I can do!
Thank you, I did get a reply from Susie via facebook.
Oh good!
Very nice redo!! I do have a question, I notice that the door for the storage compartment . How do you secure it? Have you changed the locks? The locks they use for these all keys fit the same lock. Just curious as I know coming through the cargo holds is the main way thieves get into the camper….
Hi! Actually I wrote this article about Susie and her RV, so unfortunately I don’t know the answer to your question, but that’s a good point for anyone else considering this project about it being a good idea to change the locks!
Has you or anyone you know ever changed the master bedroom area into a sitting area. It’s just the 2 of us now and our camper is the traditional jack knife sofa and dinette. I want to change the master area to 2 recliners and tv and we move sleeping to the full bed in the back but husband doesn’t think it will work
I do know of a family with a toy hauler that turned the master bedroom into the kids’ room (removed the bed and closet and built a bunk in the closet area) and used the toy hauler garage as the master bedroom. You can see pictures here. If you plan to remove the bed I would just make sure there’s nothing under it above floor level first – ours has our slide mechanism in that space. I would also make sure to keep the weight distribution relatively equal to what it is now. Have you seen any of the front living floor plans? They are kind of like what you describe, with the living area up in the gooseneck. But maybe it would be easier in your case to reconfigure the current living area?
very nice remodel, but i have a fema camper that i need to do the same thing with my bunks are straight along the outer wall i was thinking of a corner desk in the back since i only have one window and i need for plants i can use the front part for a broom closet cut at an angle so that it doesn’t take up the main door space, i would like to find a used washer and dryer for a camper that’s cheap and i need a refrigerator