This website contains affiliate links, meaning I may receive a commission, at no extra cost to you, if you purchase a product after clicking my link to it.
I write about a lot of other people’s RV ideas here at RV Inspiration, but for this blog post I decided to show you what my RV looks like inside!
About Me
My name is Ashley Mann, and I am the owner and author of this blog. 🙂 I live in an RV with my husband Josiah and our Kitty. You can read more about us here. We are also on Instagram as @OurRVAdventure.
About Our RV
Our RV is a 2009 Keystone Everest fifth wheel that we purchased used from the original owner in 2016 to live in full time. We are parked in a mobile home park in Kansas City, Kansas, for now for my husband’s job, and in fact we haven’t yet bought a tow vehicle, but we hope to be mobile within the next couple of years.
I do realize that before we move our RV I’m going to have to go through and secure everything, move decor, etc., but that’s not something I’m too worried about at this point since for now we are stationary.
And now for the tour….
Entry Area
Directly in front of you when you enter our RV is a bamboo shoe shelf. The previous owners never wore shoes inside the RV, and after living in Korea for a year teaching English in 2009, I always wanted to adopt a no-shoes tradition in my own household. We aren’t religiously strict about no shoes in the house, but for the most part we leave our shoes right here.
On the wall to the left of the door we added a coat rack, mounted using the screws that came with it.
To the right of the door we have wall baskets from World Market where we store hats and gloves, bills, stamps, checkbooks, and all the little odds and ends that it’s nice to drop somewhere when you first come inside.
The previous owners of our RV made plexiglass covers for the screen that attach with Velcro, which is nice for days where you want a little more sunshine but don’t want to have the door open. Also it lets us remove the panel on top but leave the one on bottom so Kitty can’t tear up the screen door.
To the right as you enter are the stairs leading up to the hallway with the bathroom on the left and the bedroom straight ahead. We built a tunnel through our stairs for our Kitty to access his litter box in the storage bay. We did this by removing the wood vent cover (just like the one on the front of the first step) and covering the exposed aluminum beams with a piece of carpet remnant.
The tunnel is a cardboard concrete form from Lowe’s. We used foam core poster board as a makeshift cover for the area under the stairs since there are a lot of wires back there that we don’t want Kitty to be climbing around in. I plan to make it prettier one of these days but for now it does the job.
Update: I re-did the tunnel to the litter box, and you can see it in my blog post about all the ways we accommodate Kitty in our RV!
Living Area
The photo on the left is what the RV looked like before we bought it, and on the right is what it looked like after we moved in.
These are the main changes we made right away to make it better suit our needs and taste.
- Removed the factory-installed window coverings (but we left the pull-down shades)
- Painted the walls a neutral “greige”
- Replaced the sleeper sofa, recliners, and bar stools with a desk, love seat, and my sewing machine.
A lot of people choose to paint their cabinets as well, but we actually love the maple cabinets; in fact the book case with the giant window and retractable TV was the main reason we chose this particular floor plan. We would like to replace our flooring with vinyl plank at some point, though.
Continuing with the tour, this is our dining area. This is actually the first dining table we have owned since we got married in 2011, and I am so happy that we can now sit down together for meals instead of just eating on the couch while watching TV or looking at our laptops. I also love that there is hidden storage under the table top and chair seats.
As you can see, I decided to add curtains after being inspired by other RV owners’ window coverings. I also added a rack for my wine and liquor glasses. I will definitely find a way to protect the glasses when we move the RV.
Here is a DIY project I did. On the wall between the dining table and couch is this wall sconce. In looking for ways to add some color to the RV, I decided to make a cover for it that I could remove and change if I wanted. You can read all about that project in this blog post.
Update – 2018:
I decided to get rid of our dining set and replace it instead with an armchair from Wayfair.com and a folding table from Ikea along with a couple of matching folding stools which I got from Etsy (they’re not pictured but you can see what they look like here – the guy who made them was kind enough to make them a couple of inches taller for me since I added wheels to the bottom of my table legs and this raised the height of the table).
I also moved my sewing machine next to the couch. This freed up a lot of space in the living area, plus added an extra comfy place to sit. And if we want to sit at a table for dinner, or if I need extra counter space for cooking, we can always pull out the table.
Next we come to the couch. This was the couch that came with our RV. It was a sleeper sofa with an inflatable air mattress.

At first I had planned to keep the sofa and cover it with a slipcover. I bought this slipcover and really liked how it looked. Kitty liked it too, apparently.

But unfortunately the couch just wasn’t comfortable to sit on. Since it was our main seating for every day, we decided to buy a new couch, and ended up deciding on this one from Ikea, which came in a box and was assembled in our living room.
Something else we added to the RV was this storage ottoman / coffee table that I’d had for years but spray painted and reupholstered with a canvas drop cloth when we moved into the RV. We use it to store shoes that we don’t wear as often.

I built this shelf to go behind the couch using 1″x6″ lumber and shelf brackets as an extra place to set potted herbs during the winter, because one can never have enough plants! The shelf brackets are mounted on the wall with screws and wall anchors and have been very sturdy.
Kitty likes the shelf because he can sit on it to monitor the neighborhood.
Recently I added a shower shelf spray painted gold to the corner for even more plant space. 🙂
I made my curtains out of flat sheets. (You can also see my bird feeders, which are hung on the outside of the window using these adhesive hooks.)
I also made curtain rods out of stained dowel rods with drawer knobs in the ends and hung them using Command hooks which I hot glued directly to the top of my window shades (leaving the screws exposed in case I needed to remove them). I would have stuck the hooks directly to the wall, but it turned out that my lovely drawer pulls were too large to allow that.
This is my husband Josiah’s work space. Josiah is a web developer, and even though he currently works for a local company in Kansas City, he also works from home a lot. He is also a musician. Because of all that, he needed a desk that could serve multiple purposes, so he built this one using the metal frame of an old Walmart desk he used to own, but adding maple plywood slabs with a pull-out tray for his mouse and keyboard. The electric piano can be pushed up under the shelf while Josiah is using his laptop, or pulled out for playing.
At the bottom right of the photo you can see my sewing machine, which is probably the most impractical thing we own in our RV, but I love my sewing machine so much. It is a 1950’s Singer cabinet sewing machine that belonged to my great-grandmother, and I refinished the cabinet myself. It is also the only sewing machine that I felt like I could understand how to use without ending up in tears of frustration. I like being able to see exactly how the mechanism works.
Another 2018 Update:
I really dislike our brown carpet, and since we haven’t yet gotten around to replacing it with vinyl flooring, I decided to buy an area rug. I like the look of the living area so much better with the rug. (This picture was taken before we replaced our dining table.)
Kitchen & Dining Area
Here’s another before and after for you: our kitchen.
I used mug hooks to mount storage baskets (which I spray painted gold) to the end of the cabinet for storing onions, potatoes, apples, etc., and I hung another basket for fruit over one of the cabinet doors.
Below is our coffee station. We take coffee very seriously, lol. The espresso machine is a Breville BES870XL. We use it for making lattes, but if we want a regular cup of coffee we use the French press sitting on top, which I highly recommend if you want a great way to make coffee that doesn’t take up a lot of space. The basket on the wall is from World Market and holds our manual coffee grinder, pour-over cone, and moka pot (which I used for making stovetop espresso before we got the espresso machine). Our moka pot isn’t available online currently, but this one is very similar.
On the refrigerator you can see our hygrometer/thermometer – an essential for RV living!
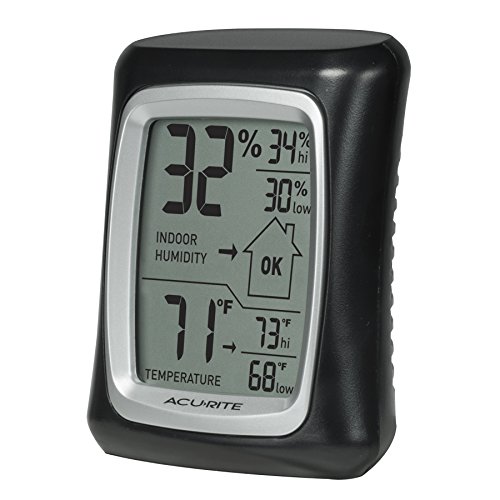
Our refrigerator is magnetic, so I bought magnetic hooks which I use to hang pot holders, measuring cups and spoons, etc. If our fridge had not been magnetic, I would have used Command hooks instead.
I found a nifty way to store my pizza pan by using magnets to stick it to the side of the microwave.
I actually purchased the pot rack before we had even seen the RV, haha, but then when I went to install it I quickly discovered that our ceiling is made of metal, and there was going to be no screwing into the ceiling. Fortunately my husband had an idea, which was to remove the screws from the vent cover and screw the pot rack into those holes. And it worked! How lucky that the vent was located exactly where I wanted the pot rack!
This wall-o-spices is my pride and joy. You can read about how I made it here.
This was a neat discovery: it turned out that behind the panel under our pantry cabinet was just empty space, so I turned it into a place to store jars.
We also got a pet fountain for Kitty to drink out of, because he prefers to drink running water. At our old house we used to have to wait for him to take long drinks out of the sink faucet, but when we moved into the RV I decided this would be a better option.
The rack where my cutting boards and baking sheets are stored was actually purchased to hang on a cabinet door, but when it ended up not fitting I figured out a way to mount it over the panel that covers the space where our converter is located instead. If I had been planning to purchase a rack to put there, I would have purchased this one instead.
I store my silverware next to the sink in a basket I got from a thrift store with tin cans as dividers. I like having the silverware there where it’s handy to put away. Something else I want to mention about this photo is the sponge caddy in the sink. I used to have problems with the suction cups constantly slipping or falling off, but then I read a tip that said it would stay put if mounted in the corner of the sink, and it was true!
It really bugged me to always have the ugly dish soap bottle sitting on the counter, but we were too lazy to put it in the cabinet underneath the sink each time, so I bought this nifty little squeezable rubber soap bottle. It comes in lots of pretty colors (mine is the gray one). It’s the little things.
Bathroom
Organizing the medicine cabinet wasn’t my top priority, but when I wrote a blog post about bathroom organization ideas I decided to purchase some baskets so that when we are ready to be mobile stuff shifting around in the cabinet is one less thing for me to worry about.
I also put a corner shower shelf in the corner of the bathroom and hung a full-length mirror over the door.

I love storage items that hang on a cabinet door. I use over-the-cabinet-door towel bars for hanging both my hand towel and a bath mat.
Here’s something else I did to prepare for future travel. I wanted to be able to pack and go in as little time as possible, so I added plexiglass “walls” to the shelves in my shower so I could leave everything on the shelves without it falling off. I wrote a blog post about this DIY project as well.
Bedroom
This is the “before” and “after” view of our bedroom. I replaced the bedspread with an inexpensive down comforter and duvet cover from Target which I love; the comforter keeps me warm and cozy in winter but doesn’t make my husband hot in the summer, and the duvet cover feels like a sheet on the bottom and can be removed and laundered so we don’t have to use a flat sheet, which makes bed making a cinch.
I also covered the mirrored closet doors with faux rice paper window film to mimic the look of a Japanese shoji screen. I wrote a blog post that tells about how I made them.
Here are some of the ways I save space in our closet. (I told where I got each of these items in a blog post about closet organization ideas).
I also use hanging organizers on the doors in my bedroom for extra clothing storage.
We have a Splendide Vented Combo washer/dryer that has worked great for us so far. We put our dirty laundry in the hamper hanging on the wall; the canvas bag can be removed from the frame and closed with a draw string if needed. We actually just use the plastic laundry basket for extra storage.
Kitty spends a lot of time in the bedroom, too.
That’s it for the inside of the RV! If you would like to hear about the outside of our RV you can head over to my article about how we prepared our fifth wheel for winter living!
This is great!!! I love your floorplan. I love the closet door now that you covered the mirrors… most of all I love how you found ways to accommodate your kitty!!
Thanks! <3
Yes i love all the organization tips. As we are looking at gettingand moving into an rv full time. With my 13 yeard 15lb cat and 2 60 lb dogs. 10 and 6. As my husband is a respiratory therapist. And is looking at taking contract jobs. Im scared but excited . But difently want it to feel like home for us and the pets. And the cat box os my one issue
Did you see my article about places to store a litter box in an RV? Maybe you’ll find an idea there that would work for you! 🙂
This was fantastic review on everything you wrote about. I am truly impressed with all of you organizational tips as well. Thank you very much for the inspiration. Happy redecorating Jody
Thank you so much, Jody!
This RV is incredible. The photos are gorgeous and it looks like a mobile penthouse lol
Aw, thank you so much! It has been fun to live in!
Amazing Pics, I love the way you have stored your spices and organized the pots. 🙂
Thank you!
I love the curtain rods you made with drawer knobs! How creative and pretty. And hiding the litter box: you are truly brilliant.
Someone once said, “The secret to creativity is knowing how to hide your sources!” I was inspired by other people’s similar creative solutions for both of those projects! 🙂
Wow! My husband keeps threatening to buy an RV (not to live in) but it just doesn’t appeal to me, mainly because of the space. But you have so many good ideas…i’ll try to soften.
Ha! You just have to negotiate…tell him you’ll let him get one as long as you get to decorate it! 🙂 And thanks!
The RV biz must be booming right now! I’ve been really into the whole tiny home trend lately- it’s super appealing. Your kitchen in there looks awesome!
Thanks! Yeah it seems like the number of people who have chosen to live in RVs full time has grown exponentially in just the last year or two!
Aaaaaaah, Ashley I love this. Your rv is fabulous and I love all your great storage and decorating ideas. Perfect, just perfect!
Thanks for the tour! We’ve been 3 years full-time, but just bought an RV Park in Passaic Mo…. Show-Me Rest RV Park. The only way to live! Blessings !
Great mods! I am concerned that you will be way over your GVWR for your trailer. I think those things can carry close to 1800 lbs. max.
I am definitely aware of that possibility, and the first thing we will do before moving is drive it to a weigh station, which is fortunately only about a mile from where we are parked. We may even rent a U-haul for some of our stuff until we know how much cargo weight we have to spare. We would also plan to drive with empty gray and black tanks, which should save some weight. Thanks for the safety reminder, though!
Hi Ashley,we have the same camper. Love it very much. Our camper is 2009 it has lots of room and space. Like all your ideas and changes. Thanks for the tour. Teresa Smyth
It has been a great camper/home for us! Glad you enjoyed the tour! 🙂
Dear Ashley! You’re really fantastic and creative!! Your RV it’s just amazing! Sooo cozy!
I love the magnet idea for spices! So cool! My project for 2018 is to buy a trailer! I do miniatures for dollhouses and I do shows around US, so my big dream is not to travel only by plane, but driving and towing my small paradise!
Thank you for all your nice tips!!
Kisses,
Betinha Murta from Florida
You are so kind! I took a look at your Etsy shop – your miniatures are beautiful! I just love anything miniature…I always wanted a Victorian dollhouse; at one point when I was a kid we lived next door to a nice elderly couple who had one and let me come over and play with it once in a while. I did turn the bottom cabinet of a book case into a miniature bedroom and make things for it inspired by this book published by American Girl. I think that’s connected to why I enjoy living in an RV so much – it’s kind of like getting to set up and decorate a play house to live in! I am sure you will have a blast with your own!
I live in Florida also, between Tampa and Orlando. I used to have a special doll house my Uncle made for me. It was handed down to relatives. I am 78 years old, a widow, and would love to get a Ram Promaster commercial van to turn into a second home. Would love to come to see your doll house/miniatures if you come within driving distance of Lakeland, Fl. e-mail: [email protected]. Looking to hear from you!
Hi could you send me more pictures of the microwave and the cabinets . We have the same camp just a little different. We have a small microwave with vent fan. I can’t even see in the microwave. Wanting to change it up. Thanks for the tour.
Hi Teresa! I would be happy to send you some more pictures but I don’t know a good way to add more than one to the comments here…would you mind sending me an email at [email protected] and I can email them to you?
G/Day Ashley, Australian rigs are usually not more than 25ft & maybe one slideout. Rigs like yours just fall to bits on our roads unless strengthened, You need to seriously declutter if you intend future travel. Top marks for your ideas but i like everything out of sight & not hanging on the outside of cupboard doors etc. Fuel is expensive in Australia & places sometimes far apart means cost of fuel for the tow vehicle become impractical for a rig of your size..for the standard Aussie. Still your over there & i’m over here & a lot of things are different between the two countries but we are the same in our love to travel in our motorhomes. I wish you both well in your travels.
Cheers John
Hi, thank you for your comments! One thing I am definitely mindful of is the weight of everything…I intend to be certain the weight of our cargo is under the maximum before driving anywhere other than maybe to the weigh station. That aside, it will definitely take some time to get everything road ready, but that’s okay because if we move our RV it will be more like moving than like traveling as we would probably be in our next location for several months at least, so I will probably just pack some of the stuff in boxes just like people normally do when moving. I will probably get rid of stuff too. I’ve been hanging on to some things while we’re parked just because I have no reason to get rid of them while we are stationary (like some glass bakeware, for example), but they would definitely be impractical for travel and I have more than I need. To be honest though…we are kind of itching to downsize and get a motorhome so that we can actually be more mobile! Although I have seen people who are mobile with RVs as big as ours and with as much “stuff” and decor as ours.
Hi, Ashley. Did you put in a different shower head setup in the showrr? If do, can you explain what you did?
Yes, I purchased an Oxygenics shower head in hopes that it would give me a longer shower. It turned out though that the problem with my shower length was not with our old shower head but with our hot water heater, which we ended up having to replace. I decided to keep the shower head, though, because it was really nice and had multiple spray options. A lot of RV owners with low water pressure say this brand helps them have a higher pressure shower. Also it may give some people a longer shower; it just depends on the flow rate of your old shower head. I believe this model has a flow rate of 1.75 gallons per minute.
Replacing it was pretty easy; I just unscrewed it from our old hose (which I kept because the one that came with the shower head was really stiff) at the base of the handle and screwed the new one on.
There is a link to the exact model we have in this blog post.
Wow! I am so excited to find your website as we have been fulltime rv-ers for more than 10 years and I am always looking for creative new ways to store stuff and dress up our little space. Amazingly we have an RV almost identical to yours (Keystone Challenger 2009) in floor plan and design, so most of your ideas can fit perfectly into ours. I’m definitely getting the hanging storage baskets to hang near the door (why did I not think of that?!) and the coat rack for the other side, brilliant!
Thank you Ashley!
I am so glad to hear you found these ideas helpful! Have fun with your newly organized RV! 🙂
Thank you so much! Actually, I wonder if you are able to share the name and brand of the color that you painted your walls with? Did you prime the walls before painting? They look lovely.
Thank you again for all that you do!
I absolutely love your ideas…can’t wait to try some of them out! thank you…thank you…thank you for sharing!
Just finished “the tour” and I am impressed and inspired! I live tiny in a 30ft travel trailer in a permanent spot and love tiny living! At first it was hard downsizing but a completely different feeling when it was finished and I settled into my tiny home. And I am gradually making it truly “home”!
I don’t think I will ever trade this lifestyle for a traditional house as I like how it feels to be uncluttered.
I garner lots of ideas from you and people like you that live tiny and love it. I keep “stuff” to a minimum and if I ever did have to move my home it would not take long to get it ready.
I , too, have a storage ottoman with two pretty folded blankets on top to keep handy for chilly evenings and I keep my crocheting and other needlework projects inside the Ottoman plus I have a great place to prop my feet! I have a bunkhouse model but my late hubby was creative and made the bunkhouse into a huge closet/pantry combo. It is a work in progress as far as organizing it but I am slowly figuring it out.
It also holds my little lightweight portable washer/spinddryer. I can quickly move that appliance to my bathtub (sit it on a bathstep) and move it back to the closet. The washer is a great solution to.laying exorbitant amounts at a laundromat and since I live in Florida I can hang clothes out all year.
Keep up the good work and looking forward to more articles!
Glad you’re enjoying the website! Sounds like you’ve got tiny living pretty well figured out! 🙂
I’m so happy I found your site. We just moved into a RV full time a couple months ago. We are currently in KCMO due to work but hope to be traveling soon. Our jobs will force us to travel at some point. I haven’t begun to remodel as the adjustment from house to RV has been enough for now! ha ha!
I’m so glad you are enjoying the site! You sound exactly like us – we were in KCK for a year and a half, but just moved to Dallas last weekend (which is why I’m just now getting around to replying)! Good luck; I’m sure you will be traveling before you know it! For now enjoy the process of making your RV into a home!
Oh this post made me so happy. We are contemplating a similar model but a bunkhouse. We will be traveling with my toddler and I was freaking out about the litter box and traveling with cats honestly. Thank you so much!
Aw, you’re welcome! So glad to hear you enjoyed it! Good luck with your own adventure!
Hi Ashley… I finally took your tour. It’s top quality. You are so creative! I don’t expect to live in an RV, but I could sure use some of your ideas in this small apartment. I don’t think I have the energy to do much right now. Love you two. Grandpa Phll
Aw, hi! Thanks for commenting, and glad you enjoyed it and found some of the ideas useful! 🙂 Hope you are doing well! Love you!
Hi Ashley
We will be moving into our recent purchase full time in October. We have 2 kitties that will be with us and I l8ve the basement idea for their box. Can you send me info on how to do that?
I actually recently redesigned our tunnel, and I plan to write a blog post about it soon, but to be honest, every RV is different, so even if I show you how we made ours, you might end up having to come up with your own solution. I had a plan in my head of how I thought I would do it, but once we actually looked to see how the area was constructed, I was like, oh, that won’t work, and had to figure out something else. The main thing I can say is that a cardboard concrete form has worked really well as a tunnel, although I recently lined it with a litter mat (hot glued in) because his claws were starting to shred the cardboard.
Enjoyed reading your tips and seeing what you’ve done. I am about ready to purchase a small travel trailer and have been told do not put anything like screws or nails into the walls or ceilings. How did you hang all those lovely items? I have so many ideas for extra storage but not sure velcro and 3M will do the trick. If you’ve posted the answer previously, I’m sorry to ask the same question. Thanks.
I use a combination of methods. For items I intend to be permanent, like a shelf or a coat hook or a basket on the wall, I use screws, especially if it’s obvious there’s nothing behind the wall but empty space. For decorative items, I typically use acrylic mounting tape to avoid filling my walls with too many holes. I also have a blog post with a few other no-drill ideas you can check out here if you like.
Oh my goodness! So many amazing ideas. We own a 5th wheel. We’re tying up lose ends and plan on becoming full-time nomads within the year. I think I need to add a list of the ideas to my evernote lists. Thank you.
Hi, Ashley!
My hubby and I just bought the same trailer! I loved all your ideas… especially the wood shelf behind the couch! I think we’re going to do something similar in the bedroom, too. Can you tell me what your folding table is called? I tried to find it on IKEA, but did not see it… i absolutely love it though!
How cool that you have an Everest also! 🙂 The name of our table is Norden Gateleg.
Just wondering, what you guys do in a severe storm. I love the RV living idea, but I think I’d be afraid during bad weather.
Good question. It has varied based on where we’ve been living. The first place we lived as well as the place we are currently both have tornado shelters, so we go there when there’s a tornado warning. The only other place we’ve lived in our RV didn’t have a storm shelter, so I asked the other long-term residents what they did and found out about an underground parking garage that we could go to if we needed to, but thankfully we never had occasion to need to go there! It’s definitely something to be conscious of…I would suggest looking online to find out if there are any publicly accessible storm shelters if you’ll be in an area prone to storms when bad weather is predicted. I also suggest trying to avoid parking under trees with limbs that might come down on your RV. At the first place we lived there were several concerning limbs over us so I had the park maintenance staff remove them. Hope that gives you some ideas!
I just purchased the same 5th wheel and will start redo with painting first – how much paint did you use and did you use any special type of paint? Your blog has been so fun to read and see same camper looking so good!!
How cool! I would love to see a picture when you get it done – I don’t see very many renovated Everests! I can’t remember how many cans of paint we used but I don’t think it was more than two. We used two coats of Valspar Signature paint + primer all-in-one from Lowe’s with no special prep for our walls other than to wipe away any dust with a damp rag.
Looks great. We have a similar model, the Heartland Sundance. The kitchen and bathroom have a few differences, but you have given me so many great ideas that can implement into our new home on wheels.
I don’t have an RV, but I like how people come up with creative organizational solutions. I would like a van to setup for travelling or as a bug out vehicle in case the weather dictates an evacuation. On a daily basis, it’s nice to have extra comforts and room for anything needed on the road.
Do you think the magnetic sheets/spices would hold underneath the top cabinets?
I’m not sure. For underneath cabinets, I would instead recommend attaching cheap cookie sheets from Dollar Tree using acrylic mounting tape and then putting magnets on your spice containers. (I just added these magnets to my spice containers to do this in my new house and they were super strong!)
Beautiful!
Just a thought please show where you store all the things that are out and free standing? Or is this a non moving rv?
We have moved the RV from one state to another three times, and each time it takes about a day to pack things to get them ready to move and about a day to unpack. Most of the things in our RV stay where they are for moving – items on shelves are stuck to the shelves with acrylic mounting tape, wine glasses stay put except I put liquor bottle sleeves over them to keep them from banging and run a bungee cord through the rack to keep them from sliding off. I put a long curtain rod across the plant shelf behind my sofa, and we set things like the printer on the floor so it won’t slide off. I use bungee cords to secure things on my countertop like my espresso machine and my silverware caddy, and I actually put acrylic tape on the bottom of my toaster oven so it stays put on the countertop. For the furniture we just place it so it won’t be in the way when the slides come in, and then we use bungee cords and ratchet straps to keep it from sliding around. That’s pretty much it!
I know this post was some time ago but do you remember the size of the blue couch cover you got from Amazon. I just got a new used 5th wheel and I have the same couch and would like to cover it. We also have a small sectional that I’m on the hunt for a cover too. We got the 2011 Elkridge this week and I’m learning so many new ideas.
I checked my Amazon order history and it appears that I ordered the Medium.
Wow! Totally impressed at your creative and functional changes. We are new part-time RV’ers. Although we don’t live in ours we probably could….someday. “You can take the dot out of the girl but you can’t take the girl out of the dotte” 😉
<3 Thanks! :) I hadn't heard that saying, but I guess it's probably true! :)