
24 RV Kitchen Gadgets Every Camper Needs
This post may contain affiliate links.
When we moved into our first RV, I couldn’t get enough of finding and buying the best RV kitchen gadgets to keep our home organized. I loved searching for nifty gadgets that don’t take up too much space while still providing all the conveniences of a home kitchen.
Let’s dive into my favorite RV kitchen accessories from my own kitchen as well as some others I’ve found online.
The Chore Helpers
First let’s start with the gadgets that make your daily chores easier.
1. Dish drying mat
I’ve used several types of dish drainers and drying mats over the years, but I’ve come to prefer a restaurant-quality rubber bar mat.

Compare to fabric mats, these:
- Allow air to circulate under the dishes as they drip
- Take up less space than a drying rack
- Can be left out without making the counter look cluttered and
- Can simply be rinsed off if it gets dirty.

- 🥃 EXTREMELY DURABLE BAR MAT: 18 in x 12 in. Made with heavy duty and flexible rubber that is a full 0.5 in thick. Ours is made with thick elliptical prongs that stabilize martini glasses, coffee machines, bar glasses, coffee cups, and improve appearance and won't tear
2. Dish Drying Rack
If you prefer a rack for your dishes—which is especially ideal for families—collapsible racks are a great option. This one folds away easily:

- Collapsible design for easy storage
But this one can double as a carrying bin if you choose to clean your dishes at campground facilities instead of in your rig.
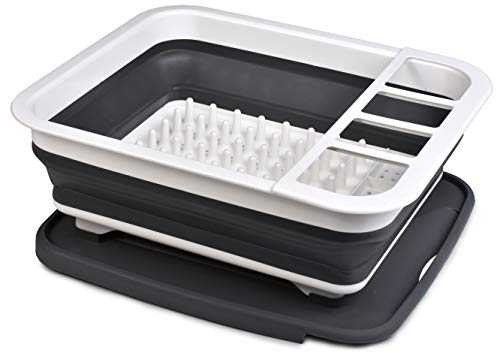
- SPACE SAVING: Simply pop-up to use and then collapse down for easy storage under the sink when not in use.
3. Unbreakable Soap Dispensers
Many soap dispensers are glass or ceramic—not ideal for an RV.
For dish soap especially, I wanted a soap dispenser I could squeeze while washing. Finally I found the perfect solution: this rubber bulb-shaped soap dispenser.
Later I decided to also add a second acrylic foaming pump dispenser for quick washing of a single dish when I don’t need to run a whole sink full of water.

4. Countertop RV Dishwasher
Who wants to spend their time on a camping trip washing dishes? With a small countertop dishwasher, you don’t have to! Most models require no plumbing to install….you just fill a tank on the back with water and let it drain into the sink.

- COMPACT AND PORTABLE: This mini tabletop dishwasher is great for small kitchens, apartments, RVs, and boats with available hookups. The space inside the dishwasher is big enough to fit 10-inch diameter dishes.
Only the fanciest RVs or renovated RVs come with dishwashers, so if you want to easily wash your dishes, you’ll want something like this.
4. Collapsible recycling bin
One thing I’ve struggled with in an RV is finding space for items I want to recycle. My solution was this collapsible bin with zipper lid from Camco, which I keep just outside the door of my RV until it’s full and can be taken to a recycling center.

- EXPLORE NATURE WITHOUT CLUTTER: Explore the outdoors without having to worry about messy items or trash! Camco's Pop-Up Container works great as an outdoor garbage can, pop up laundry basket, RV trash can, boat trash can, or yard waste container.
This bin has a variety of potential uses, from storing pool toys to using as an extra trash can while the family is eating outdoors. Of course if you’re using it for trash or recycling, you’ll want to be mindful of leaving it out at night where critters can get it. It comes in a few different color options (mine is actually just boring black).
For Your Morning Brew
Some of my favorite RV kitchen gadgets are the ones I use for making coffee.
The ones I’m sharing are perfect for your RV kitchen because:
- They require no electricity
- They take up very little space
- They aren’t made of glass and are unlikely to break
5. Stainless Steel French Press
I started making coffee with a French Press and ditched my traditional coffee maker back when I still lived in a house.

- ● Durable Construction: Made from high-quality 18/10 stainless steel that is built to last. Unlike glass French Press coffee makers, our highly rated stainless steel French press is unbreakable, shatterproof and won’t crack. With our insulated French press, liquids stay hot and ready for your next cup of coffee or tea!
Yes, you’ll need a kettle to boil water too, but this is one of the best ways to make a full pot of coffee without electricity.
I bought my stainless steel French Press pictured below after a glass one I had broke. I like it more because it’s double-walled and keeps the coffee hot for a long time.

6. Coffee Grinder
You’ll also see in the above photo my handheld grinder for coffee beans.
It takes less than a minute for me to grind enough coffee for an entire pot of French Press coffee.
- SPACE SAVING: Simply pop-up to use and then collapse down for easy storage under the sink when not in use.
7. Moka Pot
The gadget to the far right is a Moka pot, an Italian-style coffee-making device that can be used for making stovetop espresso. This is the best way to make espresso, cappuccinos, or lattes while you travel in your RV.
Moka pots come in various sizes, but we recommend a 6-cup pot because of the small size of these pots. A 1 or 3-cup pot may be too small to fit on your stove and fall through the grate. By the way, think of the number of “cups” as shots of espresso, not full cups of coffee!

- CRAFT COFFEE AT HOME: Produces six demitasse/espresso servings of rich, smooth espresso coffee in minutes. Craft your own espresso, Americano, Cuban coffee, Italian-style coffee, Moka, lattes, cappuccinos and more from the convenience of your home.Filter type:Reusable
Pair it with a milk frother and some gourmet syrup (this is our favorite kind of vanilla syrup) and you can make lattes at home.
8. Stainless Steel Coffee Mugs
Last are my stainless steel Better For Your mugs. They were an attendee gift at an RV conference Heath & Alyssa hosted recently, and I’ve been really enjoying them. I love that the company is owned by RVers, too!
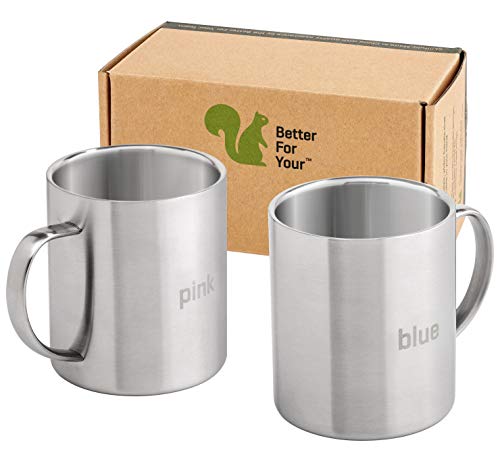
- ENJOY YOUR COFFEE FOR A FEW EXTRA MINUTES - Thanks to the clever double walled design that allows you to savor your coffee for a little longer
9. Stovetop Kettle
Electric kettles can often boil your water faster, but in an RV where you’re always thinking about how much power you’re using, you’ll want a stovetop kettle.

- Pour-Over Kettle: Ideal for loose leaf teas and coffees. With a 27-ounce capacity, this stainless steel kettle allows for more pouring and less refilling, plus it has a lovely gooseneck profile
A kettle is great for tea, French press, or pour-over coffee.
Keep reading: Space-Saving Ways to Make Coffee in an RV.
Cooking Gadgets
Now let’s get cooking!
9. Instant Pot with accessories
The Instant Pot or electric pressure cooker is the most popular cooking appliance for RVers.
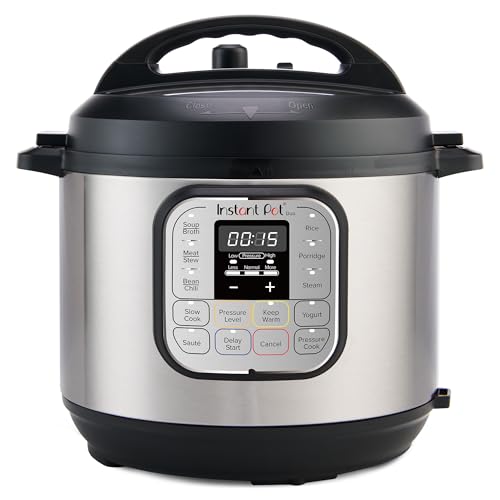
- 7 Cooking Functions: Pressure cook, slow cook, sauté, steam, make rice, yogurt, or simply keep your meal warm—all in one appliance.
I finally decided to get one when my husband became interested in doing some of the cooking. He got so good at making rice in the Instant Pot that for a while we were having rice with our lunch every day.

I ended up choosing the smallest size of Instant Pot, just 3 quarts, and it’s usually fine for just two people, but there have been some recipes (usually for soups) that ended up not fitting.
So if you like to cook a large amount of food at one time, I would recommend getting at least a 6-quart Instant Pot.
I know many RVers opt for a pressure cooker with dual functionality, like the Ninja Foodi which also includes an air fryer and dehydrator.
Product currently sold out.
The are many Instant Pot accessories you can buy depending on your cooking needs and habits, but the ones I use most often are my stackable pots. They allow me to cook more than one thing in my Instant Pot at one time. You just have to be careful when buying Instant Pot accessories to make sure you get them in a size that are made to fit in the size and type of Instant Pot you have. I found that out the hard way!
10. Immersion Blender
If you enjoy making smoothies or milkshakes, or if you like making soups that require blending, a handheld immersion blender makes both easy to blend without requiring you to sacrifice space for a full-sized blender.
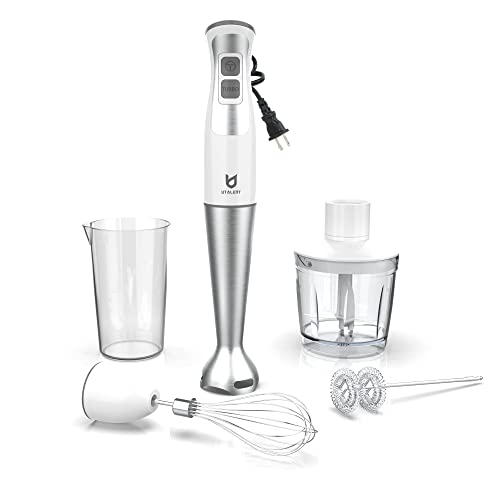
- EASY TO CLEAN & SAFE: Detachable attachments are easier to clean, chemical free with ETL, dishwasher safe and BPA free.
Many immersion blenders come with various attachments that can double as a milk frother or mixer too.
11. Small Blender
For smoothie lovers who use a blender or food processor every day, another RV blender option to consider would be a small smoothie blender, like this one.

- THE ORIGINAL BLEND AND GO PERSONAL BLENDER: This small smoothie blender blends fruit smoothies, shakes and your favorite icy drinks right in the 14 oz. BPA-free travel jar. The personal blender jar comes with a travel lid to double as a to-go cup. It's lightweight and fits most car cup holders.
12. Toaster oven
One thing I got rid of when we sold our house and later decided I wanted to have in my RV is a toaster oven.
It’s perfect for reheating food, roasting, and baking when you don’t want to heat your entire oven.

I ended up getting a cheap toaster oven from Walmart because it took up the least amount of space on the kitchen countertop, but you can get some pretty fancy toaster ovens these days.
One thing you might want to get for your camper kitchen is a set of small toaster-oven sized bakeware. Not only will it come in handy if you do use a toaster oven, but you’ll also find it fits better in a small RV oven or convection microwave. You might check Dollar Tree, too, as they sometimes carry bakeware that’s smaller than the standard size.
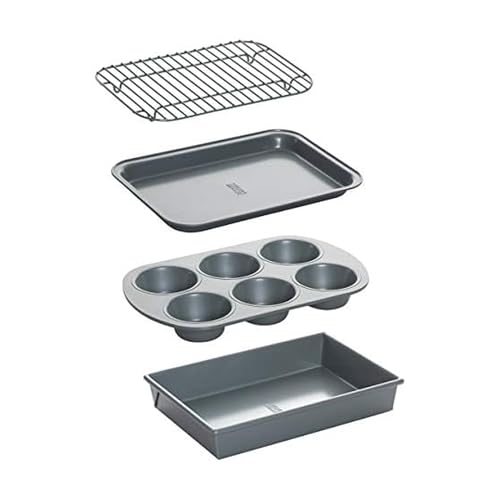
- COMPLETE TOASTER OVEN SET: Includes 9.5 x 6.25 inch baking pan, 9.25 x 6 inch cooling rack, 11 x 7 inch roast/cake pan, and 6-cup muffin pan; Perfect for small-batch baking and reheating
Space Savers
Space is scarce in an RV. These kitchen gadgets will maximize your storage!
13. Food Storage Containers
One of the best ways to save space in an RV kitchen is with items that are stackable or collapsible, such as these collapsible silicone food storage containers.

- SAFE & TEMPERATURE RESISTANT: Crafted from FDA-compliant, non-toxic, and BPA-free food-grade silicone, our containers are odorless, tasteless, non-stick, and leak-proof. They're designed for your convenience, with microwave, freezer, and dishwasher compatibility. Ideal for storing leftovers and hassle-free cleaning – just pop them in the dishwasher. Perfect for reheating meals in the microwave when you're ready to enjoy.
As much as I love the idea of the silicone containers, we use so many containers that I decided to go a different route in my RV and instead use clear plastic deli containers.
like them because you can stack a whole bunch of them and they still take up very little space, and best of all, they all take the same lid, so no searching for the right sized lid.

I got all of mine for free by purchasing foods from bulk bins at the grocery store or taking home leftovers from restaurants, but you can also buy a set of them on Amazon.
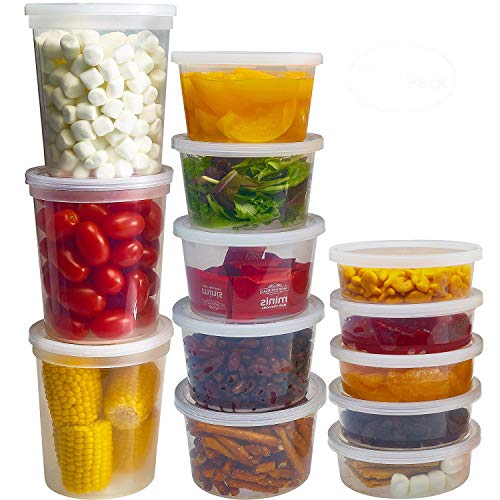
- 44 Plastic food storage containers and 44 lids in 3 convenient sizes. Clear - so you can easily see what's inside. Tight sealing lids for airtight leakproof storage.
14. Food Storage Containers
In addition to storing leftovers, I use the same containers to store dry food in my pantry cabinets. But square food storage containers maximize space better.
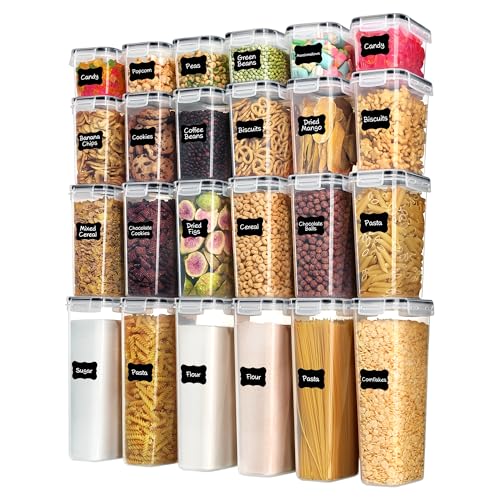
- Help Organize Your Kitchen and Pantry— Imagine every time walking to your kitchen or pantry, found everything is neatly organized. No longer messy, you can get everything you want very quickly. With the stackable and space-saving design, these containers will make more efficient use of every inch of your kitchen pantry cabinets.
15. Nested Pots and Pans
Pots and pans are another type of item that can take up a lot of space in an RV kitchen. In my RV I hung a pot rack from the ceiling (which you can see in this “tour of my RV” blog post).
But if this isn’t an option in your camper or motorhome, you can purchase nested pots and pans to save space.
If you enjoy cooking with non-stick cookware, Ninja sells a set of nesting saucepans with lids that fit neatly inside:

- CONVENIENT STACKING: Nesting cookware helps keep your kitchen organized and accessible. With this convenient system, pots, pans, and even lids easily stack to take up 55% less cabinet space (vs. individually storing).
I’m partial to stainless steel cookware, so I think this set is really cool. It comes with a universal lid and removable handle that both fit all of the pots.

- Sports Merchandise / Camping
16. Collapsible Over-the-Sink Strainer
Another cool space-saving item is this collapsible colander. The handles expand to fit your sink while you chop veggies or drain pasta, but it can easily be stashed out of the way when not in use.
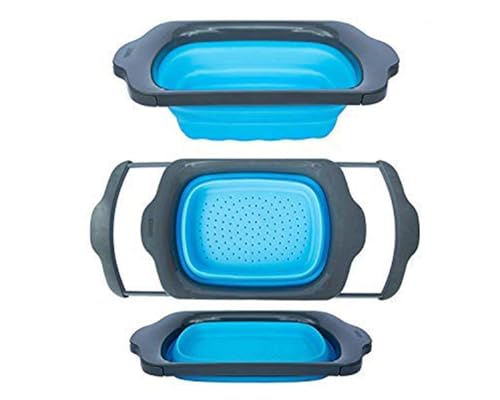
- BLUE XL COLLAPSIBLE SILICONE COLANDER – KEEP BOTH HANDS AVAILABLE WHILE YOU DRAIN – The extendable handles span most sinks at up to 25” so the colander bridges the rim and holds itself in place while you drain. Tip your pot, let the liquid fall, and both hands stay available. Works for draining pasta, noodles, canned goods, and any dish where hot liquid needs to go down the drain without a wrestling match.
Keep saving space: 25 Nesting, Folding, and Collapsible Bowls, Bakeware, and Household Items for Your RV
Unbreakables
Inviting breakacles into a moving vehicle can be a recipe for disaster. But we’ve got some tips.
17. Liquor Sleeves
To protect my glassware during travel, I use mesh liquor bottle sleeves on glass bottles and drinkware.

I also line my shelves with rubber shelf liner, and I use small tension rods to keep items on wire shelves. (The liquor bottle sleeves work well for protecting glass bottles in the cabinet, too, as well as actual liquor bottles!)
18. Stainless Steel Coffee Mug/Wine Glass
I love this stainless steel stemless wine glass tumbler. It’s the right shape to use for wine, but since it’s double-walled and comes with a travel lid it’s great for hot tea and coffee as well as cold beverages:
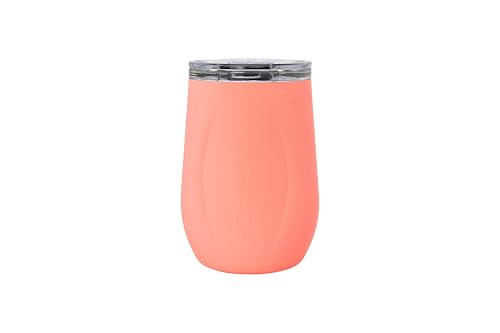
- UNIQUE DESIGN: Designed for wine connoisseurs who want their wine to stay cold and not acquire a metallic taste or smell. The exterior is made of kitchen-grade stainless steel, with a glass insert for the interior. The stemless wine glass is also double-walled and vacuum-insulated to keep your beverage chilled.
19. Quilted Dish Cases
As for protecting glass plates and bowls, one option is to place quilted cases like the ones below in your RV kitchen cabinets or drawers. You can also cut pieces of rubber shelf liner to place between each dish.

- PROTECTION - Surround your special-occasion china & crystal with the unsurpassed protection of our classic white Quilted Storage Set
20. Corelle Dinnerware
A popular choice with RVers looking for camper-friendly dishes is Corelle dinnerware, which feels like glass but is less prone to breaking. They are also incredibly lightweight compared to traditional dishware.

- VITRELLE: Our patented, made in USA, triple layered glass offer unrivaled strength and lightweight, making it a trusted choice for style and practicality.
21. Paper Plate Dispenser
If you’ve been reading this and wondering who in their right mind would ever want to do dishes in a camper instead of just using paper plates, you might appreciate having a paper plate dispenser on the bottom of one of your kitchen cabinets.

- Compact and Functional Design: Measures 10.2 inches in diameter x 2.6 inches tall, making it a low-profile plate holder that fits seamlessly into tight spaces while maintaining easy access to plates.
Read next: 10 Genius Ideas for Securing Your Stuff While Your RV is in Motion
Gadgets to help you organize
22. Adhesive caddies
I love adhesive caddies for creating a place to store small items on the back of a cabinet door. The sponge caddy pictured below is made by Command and features a drip tray you can remove and clean.

I was worried that this acrylic adhesive organizer might not stay put, but as soon as I stuck it to the door I realized it wasn’t going anywhere! You can get acrylic caddies and like this one in several different sizes.


- Wall pocket organizer for neatly storing letter- and A4-size papers and files
23. Baskets
A basket hung over a cabinet door is an easy way to make use of space. We usually put fruit in this one, which I spray painted gold.

I do have a tip for using this type of basket, though.
These baskets can slide around while an RV is in motion, and even though the hooks are lined with foam, the edge can scratch the wood. To resolve both problems, I lined the inside of the hooks with acrylic mounting tape, which holds the basket firmly in place and provides extra padding.

- XFasten Extreme Heavy Duty Mounting Tape is waterproof and can hold up to 5 lbs of mass per square inch of tape.
Below is another type of wall basket I really like on the wall next to my stove where the spices and oils I most frequently use while cooking are easy to grab. I screwed this one into the wall since I knew there was just empty space behind this wall next to my fridge. It is so sturdy I can set heavy items in glass containers in it and it won’t budge.

23. Magnetic Hooks
I love hanging as many items in my RV as possible. Not only does that make them easier to grab and put away where they’ll be safe during travel, it also makes use of space walls and other vertical surfaces that might otherwise go to waste.
One of the best places to find space for hanging things is on the refrigerator, as I’ve done in my RV:

If you’re lucky enough to have a magnetic refrigerator, you can use magnetic hooks, magnetic spice tins, magnetic caddies, etc. as storage.
If you’re refrigerator isn’t magnetic, you can either replace the panels with magnetic stainless steel, or you can use adhesive hooks and adhesive caddies instead.
You could also use acrylic mounting tape to stick a cookie sheet to the front of your refrigerator as a cheap, easy, and removable way to create a magnetic surface!
Product currently sold out.
24. Utensil Bar
One cool accessory for adding hanging storage to an RV kitchen is a utensil bar for spatulas or even small pans.

- Space Saving. Wall mounted the racks within reach in your kitchen stove, so you can clear access to the cooking utensils you common need at your fingertips while you cook without getting them off the counter or drawers. Frees up your counter space for prepping meals rather than for storage.
If you prefer not to drill holes in your RV walls, you can try an adhesive utensil bar too.

- Strong & powerful 3M self adhesive towel bar,no punch no damage to the surface of wall.Modern single towel rack,suitable for all type of bathroom decor
More ideas for your RV kitchen
For more RV kitchen ideas, click here to check out some of my other blog posts!


Ashley Mann founded RVinspiration.com in 2017. She handed off the website to new owners in 2022 to launch a new business as an online entrepreneur coach, but she still helps out as the blog editor. Ashley spent three years living full time in a 38-foot, 5th-wheel RV with her husband Josiah and their cat, Kitty. Her favorite thing about RV life is the challenge of finding the perfect way to organize a space, and she loves seeing all the creative and clever ways people come up with to customize their RVs.


Lots of goodies in this edition, thank you for sharing. We are getting ready to start our fifth wheel half of the year and tomorrow I’ll be getting the kitchen in order. One piece of equipment I love is my Ninja cooker. I can do about anything with it, plus it will keep food warm for up to 12 hours without drying it out. I love all the storage ideas!
Thank you for sharing all these wonderful kitchen storage ideas! I have saved them and are looking forward to using many of them whenever we are able to hit the road!
Glad to help! 🙂
Is your Ninja cooker the Ninja Foodie? I would be interested in hearing how you like it. I am wondering if it could replace my crockpot, pressure cooker, and my toaster oven. I have never air baked before but it looks comparable to regular baking. Could it also replace using the oven for baking or is it too small for that? So, Ashley, if you are following this post I would like you to weigh in on what you think of the Ninja Foodie too.
Thanks,
Cate
Hi Cate, I hadn’t heard of the Ninja Foodie before, but after looking at it briefly it seems to combine the functions of an Instant Pot and Air Fryer. I think my best advice would be to think about how you like to cook and which functions you would actually use. I don’t do much frying, and for roasting I’m okay with just using my oven or toaster oven, but for someone who’s considering both an Air Fryer and an Instant Pot it looks like the Ninja Foodie might be a good way to get both with just one appliance.
Collapsible silicone items are the BEST!!
Also, I love the recycling bin idea! We need to be using something like that. Thanks for sharing!
I need to get one of those collapsible recycle bins. I don’t have any place to put recyclables in my new RV.
We use an instant pot toaster, an electric oven, an electric pan and then, of course, our micro / confection oven, but mainly microwaves to reheat and make popcorn. I love our great electric oven
We like making Jiffy Pop popcorn over our gas burners! 🙂 Or if you build campfires you could make it outside, too!