Converting RV Bunk Beds to Storage: Step-by-Step Photos
This post may contain affiliate links.

Converting RV bunk beds to storage is a game-changing solution for campers needing more closet space. When full-time RVer and personal finance coach Carly Michelle discovered her 2018 Forest River Wildwood travel trailer lacked adequate storage, she knew something had to change. Tired of digging through the dinette bench seats for her clothes, she set her sights on the unused bunk beds as potential closet space.
Like many RVers who struggle with limited closet space, Carly faced a common challenge. Despite having minimal construction experience, she tackled the project head-on, removing the RV bunk beds and transforming the space into a custom-built closet. Carly says, “Having a closet has made RV life so much better. It feels more like home with a closet. I’ve never been happier to simply have a place to hang my clothes (after months of RV life without a closet!).”

The RV Bunk Bed Removal Process
To start the process of turning RV bunk beds into a closet, first Carly had a “demo” day and tore down each piece of the bunk bed. She unscrewed whatever she could, pried off the paneling, and used a saw to get the stubborn wood pieces off.

Preparing to Build the New Closet
Once the space was cleared, Carly painted all the interior walls of her RV white. Then, she measured the exact dimensions for the closet (an important step!). She searched and finally found out the best option was to get two adjustable closet rods to hang her clothes on.

Making the Closet Doors
Carly’s DIY closet consists of doors attached directly to the RV walls with hinges.
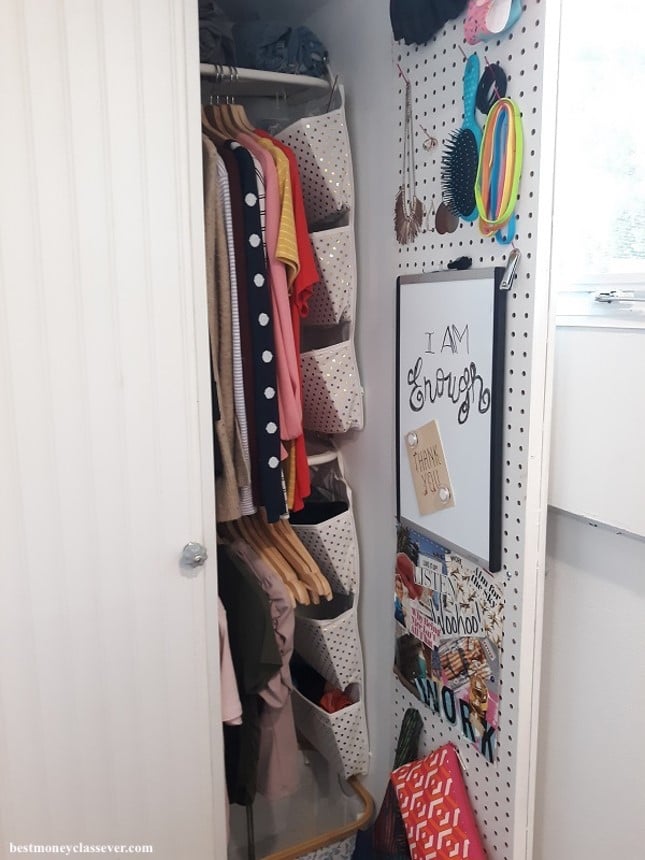
To make the doors she used white beadboard paneling for the outside of the door and pegboard on the inside of the door to have extra closet storage for hanging items. On the outside to add character she framed the beadboard with moulding.

Sandwiched between the beadboard and pegboard panels are wood studs. Initially Carly attempted to make the closet doors with only beadboard (that was just ¼ inch thick), thinking the lighter weight would be great for an RV, but it really needed framing, and the pegboard paneling ads extra storage. Carly says framing and careful measuring are key!
Carly attached the panels to the studs using heavy duty construction adhesive (a.k.a. “Liquid Nails”). Since she didn’t have clamps to hold the pieces together, she came up with the creative solution of using her RV tow bars to hold the pieces together and let the adhesive dry for 2-3 days. Once dried, she attached the doors to the wall with hinges. To complete the door, she screwed in door knobs.
Adding Extra Storage
Carly used construction adhesive and leftover beadboard to construct a shelf for her jeans above the top hanging rod (seen in the photo above). She also added two hanging wall storage organizers and a laundry basket for dirty clothes.
At the bottom of the closet , she made drawers to create extra space for shirts and shorts. She used extra scraps of beadboard and wood studs to create a frame for the drawers. For the drawers themselves, she used two wicker baskets with drawer hardware attaching them to the frame.

RV Closet Pegboard Organization
To finalize the project, Carly mounted a mirror on the inside of one door with Command Strips. To mount other items like headbands, nail clippers, bags, etc. she inserted cut leftover sticks (from fourth of July sparklers!) into the pegboards. Lastly, she added a dry erase board and a homemade vision board.

After converting the bunks to storage, Carly’s small camper now has a closet that she loves!

Questions about converting RV bunk beds to storage
Below are some of Carly’s answers to questions about the RV bunk conversion project:
Q: How long did the project take?
“Tearing down the bunk beds only took a few hours. Painting the entire RV was the next step (and that took FOREVER!). Once the space was clear it took a handful of weekends to make the closet itself.”
Q: Did this project require any special skills or prior experience?
“I had no experience in renovations and learned as I went! I just had basic knowledge of how to use a drill!”
Q: What tools were required for this project?
• Drill
• Handsaw
• Screwdriver
• Dispensing Gun
Q: What materials were used for this project, and where did you purchase them?
• 2 Closet Rods from Ikea
• White Beadboard Paneling
• Pegboard
• 4 Wood Studs
• 4 Plastic Moulding
• Construction Adhesive
• 2 Hinges
• 2 Door Knobs
• 2 Drawer Hardware sets
• 2 Hanging Wall Storage Organizers
• Mirror
Q: About how much did the project cost?
$132
Q: What advice would you give other RVers who are considering this project?
“If you want to make a closet and you have little experience, this is a doable project! Be patient with yourself and in the end you’ll finally have a closet in your RV! It’s worth the work!”
Video Tour of Carly’s Closet
In the video below, Carly shows off her new closet and gives more details about how she built it:
To see another RV bunk bed removal project, check out our article about how an RVer turned a corner bunk room into an office!
For tips on maximizing storage space for storing clothes in an RV, read this article: 15+ Clothes Storage & RV Closet Organization Ideas
Ashley Mann founded RVinspiration.com in 2017. She handed off the website to new owners in 2022 to launch a new business as an online entrepreneur coach, but she still helps out as the blog editor. Ashley spent three years living full time in a 38-foot, 5th-wheel RV with her husband Josiah and their cat, Kitty. Her favorite thing about RV life is the challenge of finding the perfect way to organize a space, and she loves seeing all the creative and clever ways people come up with to customize their RVs.




Would it be possible to make it a sewing/craft spot?
Absolutely! Great idea!
I thought about replacing the bunk beds with a closet too. You did a Fantastic job!
I did just that shortly after purchasing my bunkhouse. I had a double bunk in my rv that is now my walk in closet. I removed both double bunks. Placed a rod with shelf above on the one end then purchased 4 sterlite drawers, stacking one on top of the over. They fit perfectly along the window wall. I purchased motion detector lights and hung from ceiling, this way I don’t have to search for a switch. I then hung floor to ceiling curtains at the angled entrance. Who knew you could have a walk in closet in your RV! I love it.
Love this resourcefulness!
The back of my RV has a closet on the left, bathroom door in the middle and bunk beds on the right. The bathroom wall blocks half the bunks. Under the closet is pipetting for the bathtub and black tank vent pipes, under the bottom bunk is the water heater and water pump and plumbing, so I can’t just remove the whole bottom bunk unless I make a platform to still house all the plumbing stuff. So what I did was cut out a portion of the top bunk, leaving just enough of it against the walls to be shelf’s and put a long shower curtain rod from one side to the other lengthwise to hang clothes from. Now there’s plenty of room to hang our clothes and shelf’s for shoes or towels, and we can use the bottom bunk as a bed if we needed to still, or use it to store things and have a dirty clothes hamper.
Great idea!